A Creamy, Dreamy Dessert That Gets Better Overnight
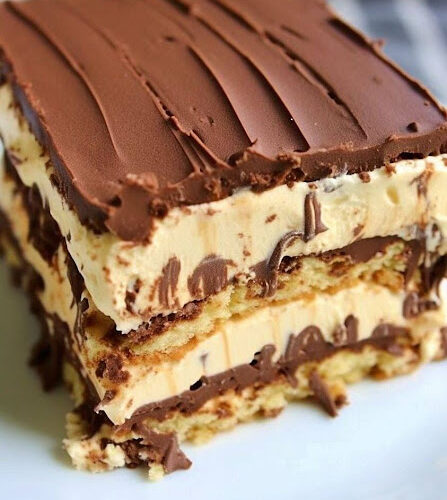
If you’re looking for a dessert that’s effortless, indulgent, and guaranteed to impress, this No-Bake Peanut Butter Éclair Cake might just become your new favorite treat. With layers of soft cookies, rich peanut butter pudding, and a smooth chocolate topping, this dessert is pure comfort in every bite—without ever turning on your oven.
Perfect for busy days, last-minute gatherings, or when you simply want something sweet and satisfying, this cake is a crowd-pleaser that tastes even better the next day. The hardest part? Waiting for it to chill long enough before digging in.
Let’s dive into this irresistible no-bake dessert that’s been winning hearts everywhere.
Why You’ll Love This Recipe
This No-Bake Peanut Butter Éclair Cake checks all the right boxes. It’s incredibly easy to prepare, requires simple ingredients, and delivers a rich, bakery-style dessert with minimal effort. The combination of creamy peanut butter, silky pudding, and soft cookie layers creates a texture that melts in your mouth.
Even better, this dessert improves as it sits. As it chills, the cookies soften into cake-like layers while the flavors blend beautifully. It’s the kind of dessert that rewards patience—though resisting a slice can be quite the challenge.
Equipment You’ll Need
Before getting started, make sure you have the following tools on hand:
- 9×13-inch cake pan
- Mixing bowls
- Electric mixer (or whisk for a good arm workout)
- Spatula
- Microwave-safe container
Ingredients
Here’s everything you’ll need to create this delicious no-bake dessert:
- 1 (14.4-ounce) box whole wheat chocolate cookies (or graham crackers)
- 2 boxes (3¼ oz each) vanilla instant pudding mix
- 1 cup peanut butter
- 3½ cups cold milk
- 1 container (8 oz) whipped topping, thawed
- 1 (16-ounce) can chocolate frosting
Step-by-Step Instructions
Step 1: Prepare the Pan
Start by lightly spraying the bottom of your 9×13-inch cake pan with cooking spray. This prevents sticking and makes serving much easier later on.
Step 2: Create the First Layer
Arrange a single layer of whole cookies (or graham crackers) across the bottom of the pan. Try to cover the entire surface evenly, breaking pieces if needed to fill any gaps.
Step 3: Make the Peanut Butter Pudding
In a large mixing bowl, combine the vanilla pudding mix, cold milk, and peanut butter. Using an electric mixer, beat the mixture on medium speed for about 2 minutes, or until it thickens.
Once the pudding is smooth and creamy, gently fold in the whipped topping using a spatula. This step creates a light, airy texture that balances the richness of the peanut butter.
Step 4: Layer the Cake
Pour half of the pudding mixture over the cookie layer and spread it evenly.
Add another layer of cookies on top of the pudding, pressing them down gently so they settle into the cream.
Next, spread the remaining pudding mixture over the second cookie layer.
Finish with a final layer of cookies on top. At this point, your cake should have three layers of cookies and two layers of creamy filling.
Step 5: Add the Chocolate Topping
Remove the lid and foil from the chocolate frosting container and microwave it (uncovered) for about 1 minute. This softens the frosting, making it easier to spread.
Pour the warmed frosting over the top layer of cookies and spread it evenly with a spatula, creating a smooth chocolate finish.
Step 6: Chill and Set
Cover the cake and refrigerate it for at least 12 hours. This chilling time is essential—it allows the cookies to soften and the layers to meld together into a cake-like texture.
For best results, let it chill for 24 hours. The flavor and texture become even more incredible with time.
Serving Suggestions
When you’re ready to serve, slice the cake into squares using a sharp knife. For cleaner cuts, run the knife under hot water and wipe it dry before slicing.
Serve chilled for the best texture and flavor. Each bite will be creamy, slightly firm, and perfectly balanced between sweet and nutty.
Delicious Variations to Try
One of the best things about this recipe is how customizable it is. Here are a few creative variations you can experiment with:
1. Chocolate Lover’s Version
Replace one box of vanilla pudding with chocolate pudding for a deeper, richer flavor. You’ll get an extra chocolatey twist that pairs beautifully with peanut butter.
2. Cookie Swap
While whole wheat chocolate cookies or graham crackers work perfectly, you can switch things up by using chocolate sandwich cookies for a more decadent dessert.
3. Nut Butter Alternatives
Not a fan of peanut butter? No problem. Substitute it with almond butter or cashew butter for a slightly different, but equally delicious flavor profile.
4. Fruity Twist
Add sliced bananas or fresh strawberries between the pudding layers for a refreshing contrast. The fruit adds a natural sweetness and a pop of color.
5. Crunchy Topping
Sprinkle crushed peanuts, chocolate chips, or cookie crumbs on top of the frosting before chilling for added texture and visual appeal.
Pro Tips for the Best Results
To make sure your No-Bake Peanut Butter Éclair Cake turns out perfect every time, keep these tips in mind:
- Give it time: The longer it chills, the better it tastes. Aim for at least 12 hours, but 24 hours is ideal.
- Use cold milk: This helps the pudding set properly and achieve the right consistency.
- Don’t skip the layering: Even layers ensure a balanced texture and flavor in every bite.
- Soften the frosting: Warming the frosting makes it much easier to spread evenly without disturbing the layers underneath.
How to Store Your Éclair Cake
Proper storage will keep your dessert fresh and delicious for days:
Refrigeration
Cover the cake tightly with plastic wrap or aluminum foil and store it in the refrigerator. It will stay fresh for about 3 to 5 days.
Freezing
If you want to keep it longer, you can freeze individual slices. Wrap each slice tightly in plastic wrap, then place them in a freezer-safe container.
The cake can be frozen for up to 1–2 months. When ready to enjoy, simply thaw it in the refrigerator overnight.
Final Thoughts
This No-Bake Peanut Butter Éclair Cake is proof that you don’t need complicated techniques or fancy ingredients to create a truly memorable dessert. With its creamy layers, rich flavors, and effortless preparation, it’s a recipe you’ll find yourself coming back to again and again.
Whether you’re making it for a family gathering, a celebration, or just because you’re craving something sweet, this dessert delivers every single time.
So go ahead—prepare it today, let it chill overnight, and treat yourself to a slice of pure indulgence. Just don’t be surprised if it disappears faster than expected!