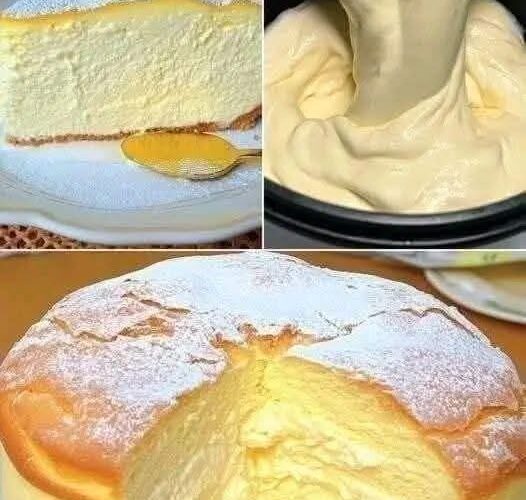
If you’ve ever wanted a cheesecake that feels incredibly light and delicate, this Japanese cotton cheesecake is the perfect choice. Unlike traditional dense cheesecakes, this version is soft, airy, and gently sweet, making it ideal for those who prefer a more balanced dessert.
This cake blends the richness of cream cheese with the structure of a sponge cake, creating a unique texture that is both creamy and fluffy. It’s a popular bakery-style dessert that you can easily recreate at home with the right technique and a bit of patience.
In this detailed recipe, you’ll learn how to make a perfectly smooth and jiggly Japanese cotton cheesecake, along with helpful tips to ensure consistent results.
Ingredients
- 200g (7 oz) cream cheese, softened
- 50g (3 tbsp) unsalted butter, softened
- 100ml (7 tbsp) milk
- 4 large eggs, separated
- 70g (⅓ cup) granulated sugar
- 40g (⅓ cup) cake flour
- 10g (1 tbsp) cornstarch
- 1 teaspoon vanilla extract
Kitchen Equipment
To make this recipe successfully, gather the following tools:
- Mixing bowls
- Hand mixer or stand mixer
- Whisk
- Spatula
- 8-inch round cake pan
- Parchment paper
- Aluminum foil
- Baking tray for water bath
- Fine sieve (optional)
Understanding Japanese Cotton Cheesecake
What makes this cheesecake special is its texture. By incorporating whipped egg whites into the batter, the cake becomes light and airy rather than dense. The result is a dessert that is moist, slightly jiggly, and delicately sweet.
This technique requires careful mixing and gentle handling, but the outcome is well worth the effort.
Step-by-Step Instructions
Step 1: Prepare the Pan and Oven
Preheat your oven to 150°C (300°F).
Line the bottom of your cake pan with parchment paper and lightly grease the sides. Wrap the outside of the pan with aluminum foil to protect it during the water bath baking process.
Step 2: Melt the Cream Cheese Mixture
In a heatproof bowl, combine the cream cheese, butter, and milk. Place the bowl over a pot of simmering water.
Stir continuously until the mixture becomes smooth and fully combined. Remove from heat and allow it to cool slightly.
Step 3: Add Egg Yolks and Vanilla
Add the egg yolks one at a time, mixing thoroughly after each addition. Stir in the vanilla extract.
At this stage, the batter should be smooth and slightly thick.
Step 4: Incorporate Dry Ingredients
Sift the cake flour and cornstarch into the mixture. This helps create a lump-free batter.
Gently mix until fully combined and smooth.
Step 5: Make the Meringue
In a clean mixing bowl, beat the egg whites on medium speed until they become foamy. Gradually add the sugar in portions.
Continue beating until soft peaks form. The meringue should be glossy and hold a gentle shape without becoming stiff.
Step 6: Fold the Batter
Add one-third of the meringue to the cream cheese mixture and mix gently to lighten the batter.
Then fold in the remaining meringue in two additions. Use a gentle folding motion to preserve the air in the mixture.
The final batter should be light and airy.
Step 7: Transfer to Pan
Pour the batter into the prepared cake pan. Tap the pan lightly on the counter to release any large air bubbles.
Step 8: Bake with Water Bath
Place the cake pan into a larger baking tray. Pour hot water into the tray until it reaches halfway up the sides of the cake pan.
Bake at 150°C (300°F) for 60 minutes, then increase the temperature to 170°C (340°F) and bake for an additional 10 to 15 minutes until the top is lightly golden.
Step 9: Cool Gradually
Turn off the oven and leave the door slightly open. Allow the cake to cool inside the oven for about 20 to 30 minutes.
This gradual cooling helps prevent cracking and collapsing.
Step 10: Chill Before Serving
Remove the cake from the pan once cooled. For the best texture, refrigerate for at least 2 hours before serving.
Serving Suggestions
This cheesecake can be enjoyed in several ways:
- Serve with fresh fruits such as strawberries or blueberries
- Add a light dusting of powdered sugar
- Pair with whipped cream
- Enjoy it plain with tea or coffee
Tips for Success
Using room temperature ingredients helps ensure a smooth batter and better mixing.
Avoid overbeating the egg whites, as stiff peaks can make folding difficult and affect the final texture.
Always fold gently to maintain the airiness of the batter.
Baking at a low temperature is essential for achieving the right structure without cracking.
Using a water bath keeps the cake moist and prevents it from drying out.
Common Mistakes to Avoid
Cracks on the surface often occur due to high heat or skipping the water bath.
A dense texture may result from overmixing or deflating the meringue.
Sudden temperature changes can cause the cake to collapse after baking.
Lumps in the batter usually come from not sifting the dry ingredients or insufficient mixing.
Storage Instructions
Store the cheesecake in the refrigerator for up to three days in an airtight container. This helps maintain its moisture and texture.
It is best served chilled or slightly cool.
Variations
You can customize this cheesecake with different flavors:
- Add matcha powder for a green tea version
- Mix in melted chocolate for a richer taste
- Incorporate lemon zest for a fresh citrus flavor
- Create a marble effect with chocolate or fruit puree
Final Thoughts
Japanese cotton cheesecake is a refined dessert that combines simplicity with technique. While it requires careful handling, the result is a soft, airy cake that stands out from traditional cheesecakes.
With practice, this recipe becomes easier to master, allowing you to create a bakery-quality dessert at home. Take your time, follow each step carefully, and enjoy the process as much as the final result.