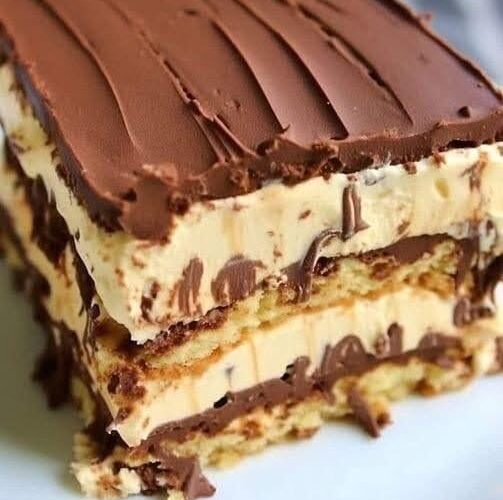
There are some desserts that win people over instantly—and then there are those that quietly become legendary after just one bite. This No-Bake Peanut Butter Éclair Cake falls firmly into the second category. It’s the kind of dessert that doesn’t just satisfy your sweet tooth; it creates a full-on experience. Creamy, rich, and layered with irresistible textures, this cake is a no-fuss masterpiece that somehow tastes even better the next day.
What makes this dessert truly special is its simplicity. There’s no oven required, no complicated techniques, and no long list of hard-to-find ingredients. Instead, you get a beautifully layered dessert featuring chocolate graham crackers, a luscious peanut butter pudding filling, fluffy whipped topping, and a silky chocolate frosting that ties everything together. The magic happens in the refrigerator, where time transforms these humble ingredients into something that tastes remarkably like a soft, indulgent éclair cake.
Whether you’re preparing dessert for a family gathering, a casual dinner, or just treating yourself to something sweet, this recipe delivers every time. And fair warning: once people try it, they’ll ask you to make it again and again.
Why You’ll Love This No-Bake Dessert
There’s a reason this recipe has become such a favorite in kitchens everywhere. It’s incredibly easy to make, but it tastes like something far more elaborate. The layers soften as the cake chills, creating a texture that’s smooth, creamy, and almost cake-like—despite never going near an oven.
Another standout feature is the flavor combination. Peanut butter and chocolate are a timeless pairing, and here they come together in perfect balance. The peanut butter adds a rich, nutty depth to the creamy pudding layer, while the chocolate graham crackers and frosting bring sweetness and structure.
Best of all, this dessert is ideal for making ahead. In fact, it actually improves with time. After several hours in the fridge, the layers meld together, and the graham crackers soften into a tender, cake-like consistency. Waiting may be the hardest part—but it’s absolutely worth it.
Equipment You’ll Need
Before you get started, gather your tools to make the process smooth and stress-free:
- 9×13-inch cake pan
- Mixing bowl
- Electric mixer (hand or stand mixer)
- Spatula for folding and spreading
- Microwave-safe container
This is a minimal setup, which makes cleanup just as easy as preparation.
Ingredients
Here’s everything you’ll need to create this indulgent no-bake cake:
- 1 (14.4-ounce) box chocolate graham crackers
- 2 (3¼-ounce) boxes vanilla instant pudding mix
- 1 cup peanut butter
- 3½ cups milk
- 1 (8-ounce) container whipped topping, thawed
- 1 (16-ounce) can chocolate frosting
Each ingredient plays an important role in building the layers of flavor and texture that make this dessert so memorable.
Step-by-Step Instructions
Step 1: Prepare the Pan
Start by lightly spraying the bottom of your 9×13-inch cake pan with cooking spray. This helps prevent sticking and makes serving much easier later on.
Next, arrange a single layer of chocolate graham crackers across the bottom of the pan. Break pieces as needed to fit and create an even base layer. This will serve as the foundation of your cake.
Step 2: Make the Peanut Butter Pudding Filling
In a large mixing bowl, combine the vanilla instant pudding mix, milk, and peanut butter. Using an electric mixer, beat the mixture on medium speed for about 2 minutes, or until it thickens and becomes smooth.
Once the pudding is fully mixed, gently fold in the whipped topping using a spatula. Be careful not to overmix—folding helps maintain the light, airy texture that makes this filling so creamy and delicious.
Step 3: Build the Layers
Now comes the fun part: assembling the cake.
- Spread half of the peanut butter pudding mixture evenly over the graham cracker base.
- Add another layer of chocolate graham crackers on top of the pudding.
- Spread the remaining pudding mixture over this second layer.
- Finish with one final layer of graham crackers on top.
Take your time to spread each layer evenly—this ensures every slice looks as good as it tastes.
Step 4: Add the Chocolate Frosting
Remove the lid and foil from the can of chocolate frosting, then microwave it (uncovered) for about 1 minute. This softens the frosting, making it easy to pour and spread.
Carefully pour the warmed frosting over the top layer of graham crackers. Use a spatula to spread it evenly, covering the entire surface of the cake.
The glossy chocolate topping is the finishing touch that brings everything together.
Step 5: Chill and Let the Magic Happen
Cover the pan and place it in the refrigerator for at least 12 hours.
This step is essential. As the cake chills, the graham crackers absorb moisture from the pudding and soften into a cake-like texture. The flavors blend, the layers settle, and the entire dessert transforms into something truly special.
If you can wait longer—up to 24 hours—it gets even better.
Tips for the Best Results
- Be patient: The longer the cake chills, the better the texture and flavor.
- Use creamy peanut butter: It blends more smoothly into the pudding mixture.
- Spread evenly: Uniform layers make a big difference in both appearance and taste.
- Slice with a sharp knife: This helps keep the layers intact when serving.
Variations to Try
Once you’ve mastered the classic version, you can experiment with different twists:
- Crunchy Peanut Butter: Adds texture and a nutty bite.
- Chocolate Pudding Swap: Replace vanilla pudding with chocolate for an extra chocolatey version.
- Caramel Drizzle: Add a drizzle of caramel sauce between layers for added richness.
- Mini Cups: Assemble individual servings in cups or jars for easy portioning.
These variations allow you to customize the dessert while keeping the same easy, no-bake method.
Serving Suggestions
Serve this cake chilled, straight from the refrigerator. It’s perfect on its own, but you can elevate it even further with a few simple additions:
- A dollop of whipped cream on top
- A sprinkle of crushed peanuts or graham crackers
- A drizzle of chocolate or peanut butter sauce
This dessert pairs beautifully with coffee, milk, or even a scoop of vanilla ice cream for an extra indulgent treat.
Storage and Make-Ahead Tips
One of the biggest advantages of this recipe is how well it stores:
- Refrigerator: Keep covered for up to 4 days.
- Make-ahead: Prepare it a day in advance for the best texture.
- Freezing: Not recommended, as the texture of the pudding and whipped topping may change.
Because it holds up so well, it’s a great option for parties, potlucks, or meal prep desserts.
Final Thoughts
This No-Bake Peanut Butter Éclair Cake proves that you don’t need complicated techniques or hours in the kitchen to create something truly delicious. With just a handful of ingredients and a little patience, you can make a dessert that’s rich, creamy, and guaranteed to impress.
It’s the kind of recipe that becomes a staple—easy enough for weeknights, yet special enough for celebrations. And once you’ve tasted that first perfectly chilled slice, you’ll understand why people can’t stop talking about it.
Just be prepared: sharing might not be as easy as making it.