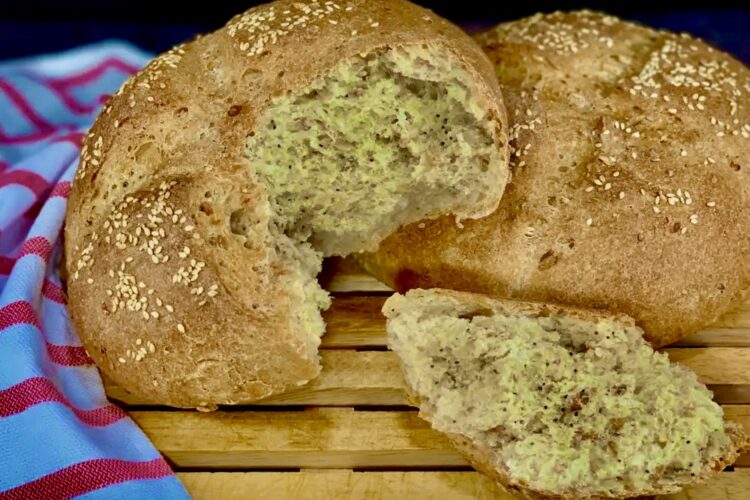
There’s something incredibly comforting about baking a loaf of homemade sourdough bread. The process is slow, intentional, and deeply rewarding. From the moment the dough begins to rise to the rich aroma filling your kitchen, sourdough baking feels less like a chore and more like an experience. And when you combine the rustic charm of sourdough with the wholesome goodness of multiple grains, you create a loaf that is both nourishing and unforgettable.
This multigrain sourdough bread recipe is packed with flavor, texture, and nutrition. It features hearty whole grains, a beautifully crisp crust, and a soft, chewy crumb that makes every slice irresistible. Whether you enjoy it toasted with butter, paired with soup, or transformed into sandwiches, this bread quickly becomes a staple in any kitchen.
Unlike commercial bread made with quick-rise yeast, sourdough relies on a natural fermentation process using wild yeast and beneficial bacteria. This slower method not only develops deeper flavor but also improves texture and digestibility. It’s an old-world baking tradition that has stood the test of time for good reason.
If you’ve been wanting to try homemade multigrain sourdough bread, this recipe is the perfect place to start.
Why You’ll Love This Multigrain Sourdough Bread
This bread combines everything people love about artisan baking:
- Crispy, golden crust
- Soft and chewy interior
- Rich tangy flavor from natural fermentation
- Nutty texture from wholesome grains
- Excellent nutritional value
- Perfect for sandwiches, toast, or serving with dinner
The addition of mixed grains gives this sourdough loaf extra depth and character. Every bite is hearty and satisfying, while still remaining soft enough for everyday use.
The Beauty of Sourdough Baking
Sourdough bread has been made for thousands of years and remains one of the oldest forms of leavened bread. Before commercial yeast existed, bakers relied on naturally occurring wild yeast and bacteria to help dough rise. This process created bread with complex flavor, longer shelf life, and remarkable texture.
The magic of sourdough lies in the starter. A sourdough starter is a living culture made from flour and water that ferments over time. With proper feeding and care, it becomes active and bubbly, ready to transform simple ingredients into beautiful artisan bread.
The fermentation process also contributes to the signature tangy flavor sourdough is known for. As the dough slowly rises, the bacteria develop layers of flavor that simply cannot be achieved with quick bread methods.
Making sourdough requires patience, but the reward is more than worth it.
Why Multigrain Bread Is So Nutritious
Multigrain bread offers far more than just good flavor. It’s loaded with beneficial nutrients that support a healthy lifestyle.
This recipe includes whole grains that contribute fiber, vitamins, minerals, and plant-based nutrients. Whole grains are known to help support digestion, heart health, and lasting energy levels.
Here are a few benefits of using multiple grains:
Increased Fiber
Fiber helps keep you full longer and supports healthy digestion. Multigrain bread contains significantly more fiber than white bread, making it a more satisfying choice.
Better Texture
The grain blend creates a hearty texture that makes each slice feel substantial and rustic.
Richer Flavor
Each grain contributes its own unique taste. Together they create a deep, nutty flavor profile that pairs beautifully with sourdough tanginess.
More Nutrients
Whole grains contain important nutrients like B vitamins, iron, magnesium, and antioxidants that support overall wellness.
This combination of flavor and nutrition makes multigrain sourdough bread one of the best homemade breads you can bake.
Ingredients You’ll Need
For the Dough
- 1 cup boiling water (8 oz / 227g)
- 1 cup Harvest Grains Blend (5 oz / 142g)
- 2 cups ripe and fed sourdough starter (16 oz / 454g)
- 1¾ cups whole wheat flour (7 oz / 198g)
- 1¾ cups all-purpose flour (7¼ oz / 206g)
- 2½ teaspoons kosher salt
- ½ teaspoon yeast
- 2 tablespoons vegetable oil (1 oz / 25g)
- 1 tablespoon sesame seeds or mixed seeds (optional)
Essential Equipment
To make the process easier, gather these tools before you begin:
- Stand mixer with dough hook
- Large mixing bowl
- Kitchen scale
- Silicone baking mat or parchment paper
- Sharp knife or bread lame
- Baking sheet or Dutch oven
- Plastic wrap or clean kitchen towel
Using a kitchen scale is highly recommended because bread baking relies heavily on accurate measurements.
Step-by-Step Instructions
Step 1: Soak the Grain Blend
Begin by combining the Harvest Grains Blend and boiling water in the bowl of your stand mixer.
Allow the mixture to sit for about 20 minutes, or until it cools to lukewarm temperature. This step softens the grains and helps them blend beautifully into the dough.
You’ll notice the grains absorbing the water and becoming tender, which improves both texture and flavor.
Step 2: Mix the Dough
Add the sourdough starter, whole wheat flour, all-purpose flour, salt, yeast, and vegetable oil to the bowl.
Using the dough hook attachment, knead the mixture until a soft dough forms. The dough should feel slightly sticky but manageable.
If the dough feels too dry, add a small amount of water. If it’s overly wet, sprinkle in a bit more flour.
Humidity levels can affect dough consistency, so don’t be afraid to make small adjustments.
Step 3: Knead Until Smooth
Continue kneading until the dough becomes smooth and elastic. This process develops gluten, which gives bread its structure and chewiness.
The transformation during kneading is one of the most satisfying parts of bread baking. The rough dough gradually becomes silky and stretchy under your hands.
Step 4: First Rise
Transfer the dough to a lightly greased bowl and cover it with a damp towel or plastic wrap.
Let it rise in a warm, draft-free place for about 1 to 1½ hours, or until nearly doubled in size.
Many bakers like to place dough inside an oven with only the oven light turned on for gentle warmth.
During this resting period, fermentation begins building flavor while the dough develops air pockets.
Step 5: Shape the Dough
Turn the risen dough onto a lightly floured surface.
Gently fold and shape it into one large round loaf or divide it into two smaller rounds.
Be careful not to overwork the dough. You want to preserve as many air bubbles as possible for a light interior.
Step 6: Second Rise
Place the shaped loaves onto a parchment-lined baking sheet or silicone mat.
Cover loosely with greased plastic wrap and let rise again for another 1 to 1½ hours until puffy.
This second rise helps create a lighter texture and improves oven spring.
Step 7: Prepare the Oven
While the bread finishes rising, place a large pan of water on the bottom rack of the oven.
The steam created during baking helps develop a crisp, artisan-style crust.
Preheat the oven to 425°F and allow it to heat thoroughly for at least 20 minutes.
A properly preheated oven is essential for good bread texture.
Step 8: Score the Bread
Just before baking, lightly brush or spray the loaves with water.
Sprinkle with sesame seeds or your favorite seed blend if desired.
Using a very sharp knife or bread lame, cut an X into the top of each loaf.
Scoring allows steam to escape during baking and helps control how the bread expands.
Step 9: Bake Until Golden
Bake the bread for 35–45 minutes until deeply golden brown.
The crust should sound hollow when tapped on the bottom.
Allow the bread to cool completely before slicing. This helps the crumb finish setting and prevents gummy texture.
As tempting as it may be, waiting is worth it.
Tips for the Best Sourdough Bread
Use an Active Starter
Your starter should be bubbly and recently fed before baking. A weak starter may result in dense bread.
Don’t Rush Fermentation
Slow rising creates the best flavor. Give the dough time to develop naturally.
Steam Is Important
Steam helps create the crisp crust sourdough is famous for.
Cool Before Slicing
Fresh bread continues cooking internally as it cools. Cutting too soon may affect texture.
Delicious Ways to Serve Multigrain Sourdough
This bread is incredibly versatile and works with almost any meal.
Here are a few favorite serving ideas:
- Toasted with butter and honey
- Topped with smashed avocado
- Served alongside soup or chili
- Used for grilled cheese sandwiches
- Paired with olive oil and herbs
- Turned into homemade croutons
Its hearty texture makes it especially perfect for sandwiches and rustic meals.
Storage Tips
To keep your bread fresh:
- Store at room temperature in a paper bag or bread box
- Avoid plastic bags, which soften the crust
- Freeze sliced bread in airtight containers for up to 3 months
You can toast frozen slices directly from the freezer for quick breakfasts or snacks.
Final Thoughts
Baking multigrain sourdough bread is one of the most rewarding kitchen experiences you can have. It combines tradition, creativity, and nourishment into a single beautiful loaf.
From the tangy flavor of natural fermentation to the hearty goodness of wholesome grains, every slice tells a story of patience and craftsmanship. Whether you’re a seasoned baker or just beginning your sourdough journey, this recipe is a wonderful way to embrace the art of homemade bread.
Once you taste a warm slice fresh from the oven, you’ll understand why sourdough baking continues to captivate bakers around the world.