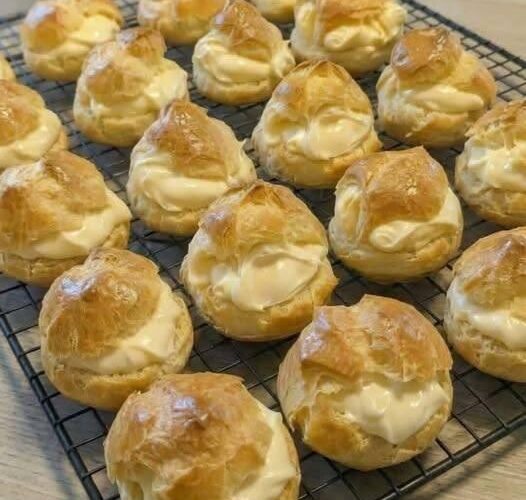
There are some recipes that instantly transport you back to childhood with a single bite. Mom’s Famous Cream Puffs are exactly that kind of dessert — nostalgic, comforting, elegant, and surprisingly simple to make at home.
With delicate golden shells that puff dramatically in the oven and a rich vanilla filling tucked inside, these cream puffs look like something straight from a pastry shop window. But behind their bakery-worthy appearance is a recipe that generations of home bakers have relied on because it works every single time.
What makes this recipe especially special is Mom’s shortcut filling. Instead of making a traditional pastry cream that requires cooking, whisking, and carefully tempering eggs, this recipe uses stabilized whipped cream with instant vanilla pudding mix. The result? A filling that’s fluffy, creamy, thick enough to hold its shape, and nearly impossible to mess up.
Whether you’re making these for holidays, birthdays, family gatherings, or simply because you want something sweet and impressive, these cream puffs deliver every time.
Why You’ll Love These Cream Puffs
There’s a reason this recipe becomes a family favorite after one batch:
- Light, airy pastry shells with crispy edges
- Easy filling that takes only minutes
- No complicated pastry techniques required
- Perfect make-ahead dessert
- Looks elegant but uses simple ingredients
- Great for parties and special occasions
The contrast between the crisp shell and the creamy filling creates that classic cream puff texture everyone loves.
What Makes Choux Pastry So Special?
Cream puffs are made from pâte à choux, often called choux pastry. Unlike traditional cake batters or pie doughs, choux dough relies on steam for rising.
As the dough bakes:
- Moisture inside turns into steam
- Steam expands and creates hollow centers
- The outer shell firms up and becomes crisp
- You get light, airy pastries ready for filling
It may sound intimidating at first, but choux pastry is actually one of the most rewarding baking techniques because the transformation feels almost magical.
Ingredients You’ll Need
For the Cream Puff Shells
1 stick butter (8 tablespoons)
Provides richness and creates structure.
1 cup water
Creates steam, which helps the puffs rise.
1 teaspoon vanilla extract
Adds subtle flavor to the pastry.
1 cup all-purpose flour
Forms the base structure.
4 large eggs
Essential for lift, texture, and shine.
For Mom’s Famous Filling
1 pint heavy cream
1 package instant vanilla pudding mix (3.4 ounces)
1/3 cup milk
Powdered sugar for dusting
Kitchen Equipment Needed
You don’t need fancy tools, but these help:
- Medium saucepan
- Wooden spoon or sturdy spatula
- Mixing bowls
- Hand mixer or stand mixer
- Baking sheet
- Parchment paper
- Serrated knife
Step-by-Step Instructions
Step 1: Prepare the Butter Mixture
Start by placing the butter, water, and vanilla extract into a medium saucepan.
Heat over medium-high heat until the mixture reaches a full rolling boil.
You want the butter fully melted and the liquid actively bubbling before moving on.
Step 2: Add the Flour
Once boiling, immediately add all the flour at once.
Stir continuously and quickly.
At first, it may seem lumpy, but continue mixing until the dough pulls away from the sides of the pan and forms one smooth ball.
This usually takes about 1–2 minutes.
You’re essentially cooking the flour here, which helps create structure.
Step 3: Cool the Dough Slightly
Remove the pan from heat.
Allow the dough to cool for about 5 minutes.
If you add eggs immediately, they may cook from the heat, which can ruin the texture.
The dough should still feel warm — just not scorching hot.
Step 4: Add Eggs One at a Time
Add eggs individually.
Mix thoroughly after each addition.
At first, the dough may look separated or slippery.
Keep mixing.
Eventually, it transforms into smooth, glossy dough.
The finished dough should be thick enough to hold shape while still soft.
Step 5: Prepare for Baking
Preheat oven to:
400°F (200°C)
Line baking sheets with parchment paper.
Drop tablespoon-sized portions onto the baking sheet.
Leave space between each mound because they expand significantly.
You can smooth rough peaks with damp fingers.
Step 6: Bake Until Golden
Bake for:
25–30 minutes
Avoid opening the oven early.
Opening the door releases steam and may cause collapsing.
The cream puffs are ready when they are:
- Deep golden brown
- Firm to touch
- Light in weight
- Hollow sounding when tapped
Transfer to cooling racks.
Cool completely before filling.
Making Mom’s Famous Filling
While the shells cool, prepare the easy filling.
In a chilled mixing bowl combine:
- Heavy cream
- Instant pudding mix
- Milk
Beat with an electric mixer.
Within minutes the mixture thickens beautifully.
You want stiff peaks that hold shape.
The pudding mix stabilizes the whipped cream, making it stronger and longer-lasting than regular whipped cream.
This trick makes these cream puffs especially practical for parties.
Assembling the Cream Puffs
Once cooled:
Slice each puff horizontally.
Generously spoon or pipe filling into the center.
Replace tops.
Dust with powdered sugar.
That final powdered sugar touch instantly makes them look bakery-quality.
Pro Tips for Perfect Cream Puffs
Use Room Temperature Eggs
Cold eggs incorporate less smoothly.
Don’t Rush the Flour Stage
Cooking the flour properly creates better structure.
Avoid Opening the Oven
Steam is your friend.
Keep the oven closed.
Cool Completely
Warm shells melt filling quickly.
Pipe for Cleaner Results
Using a piping bag gives a polished bakery appearance.
Common Mistakes to Avoid
Flat Cream Puffs
Usually caused by:
- Undercooked shells
- Too much moisture
- Opening oven early
Wet Centers
Bake slightly longer if centers remain damp.
Filling Sliding Out
Chill filling before assembling.
Fun Variations
Chocolate Cream Puffs
Drizzle melted chocolate over tops.
Strawberry Cream Puffs
Add diced strawberries to filling.
Coffee Version
Mix instant espresso powder into filling.
Mini Cream Puffs
Make bite-sized versions for parties.
Caramel Drizzle
Adds extra sweetness and elegance.
Storage Instructions
Refrigerator
Store assembled cream puffs in airtight containers for:
2–3 days
Freeze Shells Only
Unfilled shells freeze beautifully.
Store up to:
2 months
Re-crisp briefly in oven before filling.
Frequently Asked Questions
Can I make these ahead?
Yes.
Bake shells one day ahead.
Fill before serving.
Why did my puffs collapse?
Usually underbaking.
They should be deeply golden.
Can I use homemade whipped cream?
Yes, but stabilized filling lasts longer.
Can I pipe filling inside instead?
Absolutely.
Use a piping tip to fill from the bottom.
Final Thoughts
Mom’s Famous Cream Puffs prove that classic desserts don’t need complicated techniques or professional training. Their crisp shells, cloud-like filling, and nostalgic flavor create something that feels both elegant and comforting.
The first bite delivers everything you want from a cream puff — delicate pastry, rich vanilla cream, and just enough sweetness to keep reaching for another.
Whether served at family celebrations or made for a quiet weekend treat, these cream puffs are one recipe worth passing down.