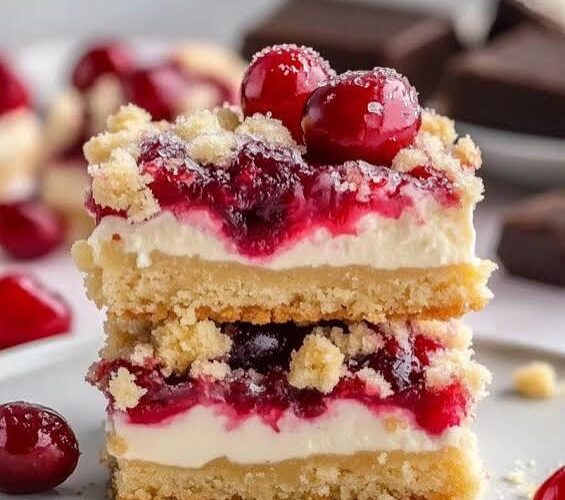
When the holiday season arrives, dessert tables become the center of attention. From cookies and pies to festive cakes, there’s always room for one more irresistible treat—especially when it combines creamy cheesecake, juicy cherries, and a buttery crumb topping. These Cherry Cheesecake Streusel Bars are exactly that kind of dessert.
Imagine layers of buttery graham cracker crust, rich vanilla cheesecake filling, homemade cherry topping, and a golden streusel crumble baked together into one decadent dessert bar. Every bite delivers the perfect balance of sweet, tangy, creamy, and crunchy textures that make these bars impossible to resist.
Whether you’re planning a Christmas dessert spread, preparing treats for a holiday gathering, or simply looking for something cozy to enjoy with coffee on a cold afternoon, these bars fit every occasion beautifully. Even better? They can be prepared ahead of time, freeze well, and slice neatly for serving at parties.
These festive cheesecake bars bring together classic holiday flavors while being easier to make than a traditional cheesecake. No water bath, no springform pan, and no complicated techniques—just simple ingredients layered into something unforgettable.
Why You’ll Love These Cherry Cheesecake Streusel Bars
There are plenty of reasons these bars quickly become a seasonal favorite:
- Rich and creamy cheesecake filling
- Sweet homemade cherry topping
- Crisp buttery graham cracker crust
- Crunchy streusel topping for extra texture
- Perfect make-ahead dessert
- Easy to transport for parties and gatherings
- Freezer-friendly for holiday prep
The combination of cherries and cheesecake creates a timeless flavor pairing, while the streusel topping adds bakery-style charm that makes these bars feel extra special.
Ingredients You’ll Need
For the Graham Cracker Crust
- 2 cups graham cracker crumbs
- ½ cup packed brown sugar
- ¾ cup melted butter
For the Cheesecake Layer
- 24 oz (680g) cream cheese, softened
- 1 cup granulated sugar
- 2 large eggs
- 1 tablespoon lemon juice
- 1½ teaspoons vanilla extract
For the Cherry Layer
- 3 cups fresh or frozen whole cherries
- ½ cup granulated sugar
- 2 tablespoons cornstarch
- 2 tablespoons water
- 1 tablespoon lemon juice
- ½ teaspoon almond extract (optional)
For the Streusel Topping
- ¾ cup all-purpose flour
- ½ cup brown sugar
- ⅓ cup cold butter, cubed
Kitchen Equipment Needed
Having everything ready before you begin makes baking much smoother.
You’ll need:
- 9×9-inch baking pan
- Parchment paper
- Mixing bowls
- Electric mixer
- Saucepan
- Measuring cups and spoons
- Rubber spatula
- Cooling rack
Step 1: Prepare Your Baking Pan
Start by preheating your oven to 350°F (180°C).
Line a 9×9-inch baking pan with parchment paper, allowing some overhang on the sides. This makes lifting and slicing the bars much easier later.
Preparing your pan properly is one of the easiest ways to guarantee beautiful slices.
Step 2: Make the Buttery Graham Cracker Crust
In a mixing bowl, combine:
- Graham cracker crumbs
- Brown sugar
- Melted butter
Mix until the texture resembles damp sand.
Transfer the mixture into your prepared baking pan and press it firmly into an even layer. Using the bottom of a measuring cup helps create a compact crust.
Bake for 10 minutes until lightly set.
Remove from the oven and allow it to cool slightly while preparing the remaining layers.
Pre-baking the crust helps prevent sogginess and keeps the layers distinct.
Step 3: Prepare the Homemade Cherry Layer
Homemade cherry filling gives these bars a fresher, brighter flavor compared to canned versions.
Add cherries, sugar, and lemon juice to a saucepan over medium heat.
Cook for about 3–4 minutes until the cherries soften slightly and release juices.
In a small bowl, whisk together:
- Cornstarch
- Water
Pour this slurry into the cherry mixture while stirring continuously.
Continue cooking for another 2–3 minutes until thickened and glossy.
Remove from heat.
Stir in almond extract if using.
The almond extract may seem optional, but it adds incredible depth that enhances the natural cherry flavor.
Allow the mixture to cool before layering.
Step 4: Make the Cheesecake Filling
Place softened cream cheese into a large mixing bowl.
Beat until completely smooth and creamy.
Add sugar and mix until combined.
Add eggs one at a time, mixing gently after each addition.
Stir in:
- Lemon juice
- Vanilla extract
Avoid overmixing once eggs are added, as excess air can create cracks during baking.
Spread the cheesecake filling evenly over the baked crust.
Use a spatula to smooth the surface.
Step 5: Add the Cherry Layer
Once your cherry mixture has cooled slightly, spoon it carefully over the cheesecake layer.
Spread evenly across the surface.
Try not to swirl the layers together—the distinct layers create the beautiful presentation these bars are known for.
Step 6: Make the Streusel Topping
In a bowl, combine:
- Flour
- Brown sugar
Add cold cubed butter.
Using your fingertips, pastry cutter, or fork, work the butter into the flour mixture until crumbly.
You want pea-sized crumbs and uneven pieces for the perfect bakery-style topping.
Sprinkle evenly across the cherry layer.
The streusel creates texture and gives these cheesecake bars their signature holiday appearance.
Step 7: Bake Until Perfect
Place the pan into the oven and bake for 40–45 minutes.
You’ll know they’re ready when:
- Edges appear lightly golden
- Streusel is crisp
- Center still has a slight jiggle
The bars will continue setting as they cool.
Avoid overbaking, which can dry out the cheesecake layer.
Step 8: Chill for the Best Texture
This step requires patience—but it’s worth it.
Allow the bars to cool completely at room temperature.
Transfer to the refrigerator and chill for at least 4 hours.
For best results, refrigerate overnight.
Cold cheesecake slices cleaner, tastes richer, and develops better texture.
Tips for Bakery-Style Results
Use Softened Cream Cheese
Cold cream cheese creates lumps that are difficult to remove.
Allow it to soften naturally before mixing.
Cool the Cherry Filling
Warm cherry filling can melt the cheesecake layer.
Cool it before assembly.
Don’t Skip the Chill Time
This step creates firmer layers and cleaner slices.
Use Parchment Overhang
Lifting bars from the pan becomes much easier.
Storage Instructions
Refrigerator
Store bars covered in the refrigerator for up to 5 days.
Freezer
Slice bars individually before freezing.
Wrap each piece tightly and freeze for up to 3 months.
Thaw overnight in the refrigerator before serving.
Variations to Try
Mixed Berry Version
Swap cherries for raspberries, blueberries, or blackberries.
Chocolate Cherry Cheesecake Bars
Add mini chocolate chips to the cheesecake layer.
Nutty Streusel
Mix chopped pecans or almonds into the topping.
Extra Festive Version
Add a drizzle of white chocolate after chilling.
Serving Suggestions
These bars pair beautifully with:
- Coffee
- Hot chocolate
- Holiday tea blends
- Vanilla ice cream
- Fresh whipped cream
They’re ideal for:
- Christmas dessert trays
- Potlucks
- Cookie exchanges
- Winter birthdays
- Family gatherings
Final Thoughts
These Cherry Cheesecake Streusel Bars combine everything people love about holiday desserts: creamy cheesecake, fruity filling, buttery crust, and crunchy topping.
They look impressive enough for celebrations but remain simple enough for beginner bakers.
Whether you make them for Christmas dinner, a cozy weekend bake, or simply because cherries and cheesecake belong together, these bars deliver layers of flavor in every bite.
Once you try them, they may become part of your holiday baking tradition for years to come.