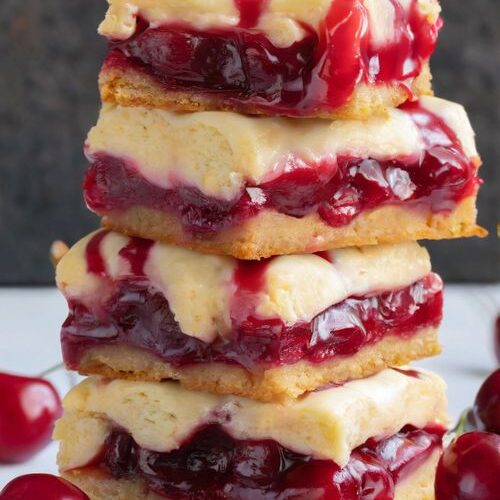
There’s something magical about holiday baking season. The scent of warm butter, vanilla, and sweet fruit drifting through the kitchen instantly creates a feeling of comfort and celebration. Among the endless trays of cookies, cakes, and candies that appear every December, these Christmas Cherry Bars stand out as a festive favorite. With their buttery crust, rich cherry filling, and delicate almond glaze, they deliver everything you want in a holiday dessert: beauty, flavor, and nostalgia in every bite.
These bars are incredibly easy to make, yet they look impressive enough to serve at holiday gatherings, cookie exchanges, or Christmas dinner. The combination of tart cherries and sweet buttery dough creates a balance that feels both rich and refreshing. And that glossy drizzle of almond-vanilla glaze on top? It’s the finishing touch that transforms these bars into a bakery-worthy treat.
Whether you’re baking for family traditions, preparing homemade gifts, or simply craving a cozy winter dessert, this recipe deserves a permanent place in your holiday collection.
Why You’ll Love These Christmas Cherry Bars
Easy Yet Elegant
One of the best things about this recipe is how simple it is. You don’t need advanced baking skills or fancy equipment. Despite the easy preparation, the finished bars look absolutely stunning with ruby-red cherry filling peeking through golden dollops of dough.
Perfect Holiday Flavor
The almond extract pairs beautifully with the cherries, creating a flavor combination that tastes festive and comforting. Every bite feels like Christmas.
Great for Feeding a Crowd
Because the recipe is baked in a jelly roll pan, you can make a large batch at once. These bars are ideal for parties, family gatherings, bake sales, and holiday dessert trays.
Make-Ahead Friendly
Holiday schedules can get hectic, so having a dessert that stores and freezes well is a huge advantage. These cherry bars can be made ahead of time and still taste amazing days later.
Versatile Recipe
Not a cherry fan? You can easily substitute peach, blueberry, strawberry, or apple pie filling for endless seasonal variations.
Ingredients
For the Bars
- 1 cup unsalted butter, softened
- 2 cups granulated sugar
- 1 teaspoon salt
- 4 large eggs
- 1 teaspoon vanilla extract
- ¼ teaspoon almond extract
- 3 cups all-purpose flour
- 2 cans (21 ounces each) cherry pie filling
For the Glaze
- 1 cup powdered sugar
- ½ teaspoon vanilla extract
- ½ teaspoon almond extract
- 2–3 tablespoons milk
Kitchen Tools You’ll Need
- 15x10x1-inch jelly roll pan
- Large mixing bowl
- Electric mixer
- Rubber spatula
- Wire cooling rack
- Small whisk
- Sharp knife for slicing
Step-by-Step Instructions
Step 1: Prepare the Oven and Pan
Preheat your oven to 350°F (175°C). Grease a 15x10x1-inch jelly roll pan thoroughly to prevent sticking.
The jelly roll pan is important because it creates the perfect thickness for the bars. A deeper pan may alter the baking time and texture.
Step 2: Make the Dough
In a large mixing bowl, cream together the softened butter, sugar, and salt until the mixture becomes light and fluffy. This usually takes about 3–4 minutes with an electric mixer.
Adding air into the butter mixture helps create a tender texture.
Next, add the eggs one at a time, mixing well after each addition. Stir in the vanilla extract and almond extract.
Gradually add the flour, mixing until fully incorporated. The dough will be thick and soft.
Step 3: Assemble the Bars
Spread about 3 cups of dough evenly into the prepared pan. Since the dough is thick, using an offset spatula or lightly greased hands can make spreading easier.
Once the base layer is smooth, spoon the cherry pie filling evenly over the dough.
Drop the remaining dough by teaspoonfuls over the cherry layer. Don’t worry about covering everything completely. The gaps allow the vibrant cherry filling to show through beautifully after baking.
Step 4: Bake
Place the pan in the preheated oven and bake for 30–35 minutes, or until the top becomes lightly golden brown.
The bars should look set and slightly puffed around the edges.
Remove from the oven and place the pan on a wire rack. Allow the bars to cool completely before glazing.
Cooling is essential because warm bars may fall apart when sliced.
Step 5: Prepare the Glaze
In a small bowl, whisk together the powdered sugar, vanilla extract, almond extract, and milk.
Start with 2 tablespoons of milk and add more if needed to achieve a smooth drizzle consistency.
Once the bars are fully cooled, drizzle the glaze evenly across the top.
Step 6: Slice and Serve
Using a sharp knife sprayed lightly with nonstick spray, cut the bars into squares or rectangles.
For the cleanest slices:
- Wipe the knife between cuts
- Chill the bars briefly before slicing
- Use a spatula to lift bars carefully from the pan
Serve and enjoy!
Tips for Perfect Cherry Bars
Use Softened Butter
Softened butter creams more easily with sugar, creating a smoother dough and lighter texture.
Don’t Overmix the Flour
Mix only until combined to avoid tough bars.
Cool Completely Before Cutting
This is one of the most important steps. The filling needs time to set properly.
Add Extra Holiday Sparkle
Sprinkle coarse sugar over the dough before baking for a festive shimmer and slight crunch.
Garnish for Presentation
Top each serving plate with a maraschino cherry or dust lightly with powdered sugar.
Fruit Filling Variations
One reason bakers love this recipe is its flexibility. Here are some delicious alternatives to cherry filling:
Blueberry Pie Filling
Creates a deep, sweet berry flavor perfect for winter desserts.
Apple Pie Filling
Warm cinnamon-spiced apples make these bars taste like apple pie in handheld form.
Peach Filling
Perfect for a brighter, summery twist.
Strawberry Filling
Sweet and vibrant with a softer fruit flavor.
Mixed Berry Filling
A combination of berries adds complexity and color.
No matter which filling you choose, the buttery crust remains the perfect base.
Storage Instructions
Room Temperature
Store the bars in an airtight container for up to 5 days.
Refrigerator
For slightly firmer bars, refrigerate them in a sealed container for up to one week.
Freezing Instructions
These bars freeze beautifully.
To freeze:
- Allow bars to cool completely
- Slice into portions
- Layer between parchment paper
- Store in a freezer-safe container
Freeze for up to 3 months.
Thaw overnight in the refrigerator before serving.
Common Questions
Can I Use Homemade Cherry Filling?
Absolutely. Homemade filling often provides fresher flavor and allows you to control sweetness.
Can I Reduce the Sugar?
You can experiment with sugar substitutes, though the texture may change slightly.
Why Almond Extract?
Almond extract enhances cherry flavor naturally and gives the bars their signature bakery-style taste.
Can I Make These Ahead?
Yes! They’re actually even better the next day because the flavors have time to meld together.
Serving Ideas
These Christmas Cherry Bars pair wonderfully with:
- Hot coffee
- Tea
- Hot chocolate
- Vanilla ice cream
- Whipped cream
They also look beautiful on holiday dessert platters alongside cookies and brownies.
Final Thoughts
Christmas Cherry Bars are the kind of dessert that quickly becomes a family tradition. They combine everything people love about holiday baking: rich buttery flavor, bright festive color, simple preparation, and comforting sweetness.
Whether you’re baking for a cozy family evening or preparing desserts for a large holiday celebration, these bars never disappoint. Their cheerful appearance and irresistible flavor make them one of the season’s most memorable treats.
Once you make them, don’t be surprised if friends and family start requesting them every Christmas.
Short Story: The Christmas Cherry Tradition
Every Christmas Eve, the snow fell softly outside Grandma Eleanor’s little red-brick house while the kitchen glowed with warmth and laughter. The counters overflowed with cookie tins, cinnamon rolls, and frosted cakes, but there was always one dessert everyone waited for most: the Christmas Cherry Bars.
Grandma never used a written recipe. She measured flour with practiced hands and added almond extract with a knowing smile. “A little extra makes the cherries sing,” she would whisper.
Her grandchildren gathered around the kitchen table each year, stealing spoonfuls of cherry filling whenever they thought she wasn’t looking. The youngest, Lucy, loved dropping tiny spoonfuls of dough over the bright red filling while Christmas music played in the background.
As the bars baked, the house filled with the comforting scent of butter, vanilla, and sweet cherries. It became the official smell of Christmas in their family.
After dinner, Grandma would drizzle the glaze carefully over the cooled bars while everyone waited impatiently nearby. Then came the best moment of all: gathering around the fireplace with warm mugs of cocoa and plates piled high with cherry bars.
One snowy Christmas, Grandma handed Lucy a faded recipe card tied with a red ribbon.
“It’s your turn now,” she said gently.
Years later, Lucy still makes the same cherry bars every Christmas Eve. The recipe hasn’t changed. Neither has the feeling it brings — warmth, love, and the sweet reminder that some traditions are too special to ever fade.