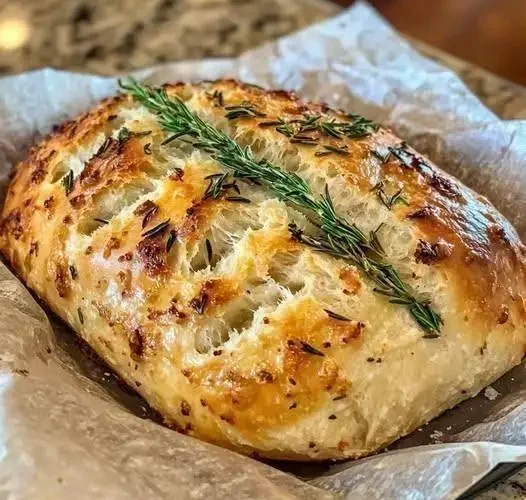
There’s something undeniably satisfying about pulling a freshly baked loaf of bread from the oven. The crust crackles softly as it cools, the aroma fills every corner of the kitchen, and suddenly the entire house feels warmer and more inviting. Bread baking has a way of slowing time down, turning simple ingredients into something deeply comforting.
Now imagine that experience elevated with the earthy aroma of rosemary and the sweet richness of roasted garlic woven into every bite. That’s exactly what you get with this Rustic No-Knead Rosemary Garlic Bread — a bakery-style artisan loaf with a crisp golden crust, soft chewy interior, and surprisingly simple preparation.
The beauty of this recipe is that it removes the intimidation factor from bread making. There’s no kneading, no complicated shaping techniques, and no expensive equipment required. Instead, time does most of the work. A slow rise creates structure, flavor, and texture while you simply wait for the magic to happen.
Whether you’re new to bread baking or already obsessed with homemade loaves, this rosemary garlic bread is one recipe you’ll come back to again and again.
Why You’ll Love This No-Knead Bread Recipe
There are plenty of bread recipes out there, but this one stands out because it combines simplicity with incredible flavor.
Here’s why this recipe works so well:
- No kneading required
- Minimal hands-on time
- Crispy artisan-style crust
- Soft and airy crumb
- Deep roasted garlic flavor
- Perfect for beginners
- Great for soups, pasta, salads, or sandwiches
Because the dough rests for an extended period, gluten develops naturally without all the kneading and effort traditional bread recipes require.
The Secret Behind No-Knead Bread
No-knead bread became popular because it delivers professional bakery results with almost no work. Instead of kneading the dough to build gluten structure, a long fermentation process does the heavy lifting.
As the dough slowly rises over 12 to 18 hours, tiny air pockets form, flavors deepen, and the texture becomes beautifully chewy and airy.
This slower process creates:
- Better flavor development
- Improved texture
- Crispier crust
- Easier handling
Patience becomes the main ingredient.
Ingredients You’ll Need
One of the best things about homemade bread is how few ingredients are needed.
For the Bread Dough:
- 3 cups all-purpose flour (bread flour works too for extra chew)
- 1½ teaspoons salt
- ½ teaspoon instant yeast
- 1½ cups warm water
- 2–3 garlic cloves, roasted and mashed
- 1 tablespoon fresh rosemary, chopped
(or 1 teaspoon dried rosemary)
Optional Toppings:
- Extra rosemary sprigs
- Flaky sea salt
- Olive oil for brushing
- Cracked black pepper
These pantry staples transform into something truly special.
Step 1: Roast the Garlic
Roasted garlic completely changes the flavor profile of this bread.
Instead of sharp, spicy garlic, roasting creates soft, caramelized cloves with sweet and mellow notes.
Preheat your oven to 375°F (190°C).
Wrap the garlic cloves loosely in foil with a small drizzle of olive oil.
Bake for about 30–35 minutes until soft and fragrant.
Allow the garlic to cool slightly before squeezing or mashing it into a smooth paste.
This simple step adds incredible depth.
Step 2: Mix the Dough
In a large bowl:
- Combine flour, salt, and yeast.
- Add warm water.
- Stir until a sticky dough forms.
- Mix in roasted garlic paste.
- Fold in chopped rosemary.
Don’t worry if the dough looks messy.
In fact, it should.
Unlike traditional bread doughs, this mixture will feel sticky, shaggy, and rough.
That texture is exactly what you want.
Step 3: Let Time Do the Work
Cover the bowl using plastic wrap, a plate, or a damp towel.
Leave it at room temperature for 12–18 hours.
During this long fermentation:
- The dough doubles in size
- Air bubbles form
- Flavor develops
- Gluten builds naturally
By morning, you’ll notice a bubbly surface and a soft, stretchy texture.
That’s your signal it’s ready.
Step 4: Shape the Dough Gently
Turn the dough onto a floured surface.
Avoid punching it down aggressively.
Instead:
- Dust lightly with flour
- Fold edges underneath
- Shape into a rough ball
The key here is being gentle.
You want to preserve those beautiful air pockets that formed overnight.
The dough doesn’t need perfection.
Rustic bread is supposed to look rustic.
Step 5: Second Rise
Place the dough onto parchment paper.
Cover lightly with a towel.
Allow it to rest for 30–60 minutes.
During this time, the dough relaxes and rises slightly again.
Meanwhile, prepare your oven.
Step 6: Preheat the Dutch Oven
Place your Dutch oven or heavy lidded pot inside the oven.
Heat to:
450°F (230°C)
Allow the pot to preheat thoroughly.
A screaming hot pot creates steam instantly when the dough goes in.
That steam creates the iconic artisan crust.
Skipping this step can lead to flatter bread with less crunch.
Step 7: Bake Until Golden and Crisp
Carefully remove the hot Dutch oven.
Using the parchment paper as handles, lower the dough inside.
Cover with the lid.
Bake:
- Covered: 30 minutes
- Uncovered: 15–20 minutes
The uncovered portion allows the crust to deepen into a rich golden brown.
Your kitchen will smell incredible at this point.
Step 8: Cool Before Slicing
This might be the hardest step.
Place the finished loaf on a wire rack.
Allow it to cool for at least 30 minutes.
Fresh bread continues cooking internally after leaving the oven.
Cutting too soon may create a gummy texture.
Patience rewards you with perfect slices.
Tips for Success
Don’t Rush the Rise
Long fermentation builds flavor.
Overnight rising always delivers the best results.
Use Fresh Rosemary
Fresh herbs create brighter, more aromatic flavor than dried herbs.
Roast the Garlic Properly
Under-roasted garlic won’t blend smoothly.
Soft, golden cloves work best.
Use Parchment Paper
It makes transferring sticky dough much easier.
Keep the Dough Sticky
Adding too much flour can make the bread dense.
Trust the process.
Why Rosemary and Garlic Work So Well Together
Few flavor combinations feel as timeless as rosemary and garlic.
Rosemary contributes:
- Pine-like aroma
- Earthy flavor
- Herbaceous freshness
Roasted garlic adds:
- Sweetness
- Richness
- Depth
Together, they create bread that feels rustic, cozy, and sophisticated all at once.
This pairing works beautifully with nearly every meal.
Serving Ideas
This bread is incredibly versatile.
Serve it alongside:
- Creamy soups
- Pasta dishes
- Roasted vegetables
- Charcuterie boards
- Salads
- Stews
- Holiday meals
Or simply enjoy warm slices with:
- Butter
- Olive oil
- Soft cheese
- Honey
Sometimes simple is best.
Storage Tips
Homemade bread doesn’t contain preservatives, so proper storage matters.
For short-term storage:
- Keep in a bread box
- Use a paper bag
- Store at room temperature for 2–3 days
For longer storage:
- Slice before freezing
- Freeze in airtight bags
- Toast slices directly from frozen
This makes homemade bread easy to enjoy anytime.
Final Thoughts
Rustic No-Knead Rosemary Garlic Bread proves that impressive baking doesn’t have to be complicated.
With just a handful of ingredients, a little patience, and almost no effort, you can create a loaf that rivals expensive artisan bakery bread.
The crisp crust, airy crumb, fragrant rosemary, and sweet roasted garlic combine to create something that feels both simple and special.
Whether you’re baking for family dinner, entertaining friends, or simply treating yourself to fresh bread on a quiet afternoon, this loaf delivers comfort in every slice.
So grab your flour, roast some garlic, and let time work its magic.
A warm, crusty homemade loaf is waiting.