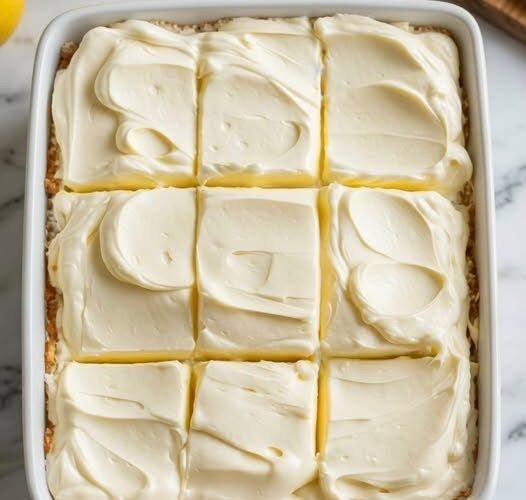
There’s something undeniably special about lemon desserts. They have a way of feeling both indulgent and refreshing at the same time — bright enough to wake up your taste buds, yet smooth enough to feel comforting. When the weather turns warm and turning on the oven sounds like the last thing you want to do, this recipe for No-Bake Lemon Cheesecake Bars becomes the perfect solution.
These creamy, chilled dessert bars combine everything people love about classic cheesecake with the light, sunny flavor of fresh lemon. They sit atop a buttery graham cracker crust, feature a velvety smooth filling, and require absolutely no baking. The result? A cool, creamy dessert that tastes like summer in every bite.
What makes these bars especially appealing is their balance. The lemon flavor isn’t overpowering or overly tart. Instead, it gently complements the rich cheesecake filling, creating a dessert that feels light, silky, and satisfying. Whether you’re making them for a family gathering, weekend dessert, holiday table, or simply because you’re craving something sweet, these bars deliver every time.
Why You’ll Love These No-Bake Lemon Cheesecake Bars
There are plenty of reasons why this recipe deserves a permanent place in your dessert collection:
- No oven required, making it ideal for warm weather.
- Simple ingredients that are easy to find.
- Quick preparation time with minimal effort.
- Creamy texture that melts in your mouth.
- Perfect make-ahead dessert since chilling does all the work.
- Easy to customize with toppings and crust variations.
These bars are proof that impressive desserts don’t have to be complicated.
The Secret to the Perfect No-Bake Cheesecake Texture
A great no-bake cheesecake should be creamy but firm enough to slice cleanly. The secret here comes from combining softened cream cheese with whipped heavy cream and dissolved lemon gelatin. This combination creates a filling that’s rich, airy, and stable after chilling.
A few tips for success:
- Always soften the cream cheese before mixing.
- Let the gelatin mixture cool completely before adding it.
- Chill long enough for proper setting.
- Avoid overmixing once the filling becomes thick.
Following these small steps creates cheesecake bars with the perfect smooth consistency.
Ingredients You’ll Need
For the Graham Cracker Crust:
- 2 cups graham cracker crumbs
- ½ cup unsalted butter, melted
- ½ teaspoon salt
For the Lemon Cheesecake Filling:
- 2 packages lemon gelatin mix
- 1 cup boiling water
- 24 ounces cream cheese, softened
- Juice from 1 fresh lemon
- Zest from 1 fresh lemon
- 1½ cups confectioners’ sugar
- 2 cups heavy whipping cream
Optional Garnishes:
- Fresh whipped cream
- Extra lemon zest
- Thin lemon slices
- Crushed graham crackers
- Fresh berries
How to Make No-Bake Lemon Cheesecake Bars
Step 1: Prepare the Pan
Start by lightly spraying a 9×9-inch baking dish with non-stick spray or lining it with parchment paper for easier removal later.
Set the prepared pan aside.
Step 2: Make the Graham Cracker Crust
In a medium bowl, combine:
- Graham cracker crumbs
- Melted butter
- Salt
Mix everything together until the texture resembles damp sand.
Transfer the mixture into your prepared pan and firmly press it into an even layer using the bottom of a measuring cup or glass.
Place the crust in the refrigerator while preparing the filling.
Step 3: Dissolve the Lemon Gelatin
Add both packages of lemon gelatin to a bowl.
Pour in 1 cup of boiling water and stir continuously until completely dissolved.
Set aside and allow the mixture to cool to room temperature. Avoid adding hot gelatin directly to the cream cheese mixture.
Step 4: Create the Cheesecake Base
In a large mixing bowl, add softened cream cheese and powdered sugar.
Beat together until completely smooth and creamy.
Scrape down the sides of the bowl as needed to eliminate lumps.
Step 5: Add the Lemon Flavor
Pour in:
- Cooled lemon gelatin mixture
- Fresh lemon juice
- Lemon zest
- Heavy whipping cream
Mix everything together until fully incorporated.
Continue beating on medium-high speed until the filling becomes noticeably thicker and fluffy.
The texture should hold soft peaks and look airy.
Step 6: Assemble the Cheesecake Bars
Remove the crust from the refrigerator.
Pour the lemon cheesecake filling evenly over the crust.
Use a spatula to smooth the surface.
Tap the dish lightly on the counter to remove any air bubbles.
Step 7: Chill Until Set
Cover the dish and refrigerate for at least 4 hours.
For the cleanest slices and best texture, chilling overnight is even better.
Once fully set, slice into squares and garnish as desired.
Tips for Perfect Cheesecake Bars Every Time
Use Room Temperature Cream Cheese
Cold cream cheese creates lumps that are difficult to remove.
Chill Longer for Cleaner Slices
The longer these bars chill, the cleaner the slices become.
Use Fresh Lemon
Fresh juice and zest create brighter flavor than bottled alternatives.
Wipe the Knife Between Cuts
Cleaning your knife after each slice creates professional-looking bars.
Fun Variations to Try
Berry Lemon Cheesecake Bars
Add fresh blueberries or raspberries to the filling.
Cookie Crust Version
Swap graham crackers for vanilla cookies or digestive biscuits.
Extra Lemon Lovers Version
Add additional zest for stronger citrus flavor.
Frozen Cheesecake Bars
Freeze completely for an ice cream-style dessert.
Frequently Asked Questions
Can I Make These Ahead of Time?
Yes. These bars are actually better when prepared ahead because extra chilling improves texture.
How Long Do They Last?
Store covered in the refrigerator for up to 4 days.
Can They Be Frozen?
Absolutely.
Wrap tightly and freeze for up to 2 months.
Transfer to the refrigerator overnight before serving.
Can I Use Another Crust?
Yes.
Try:
- Digestive biscuits
- Vanilla wafer crust
- Shortbread crust
- Cookie crumb crust
Serving Suggestions
These bars pair beautifully with:
- Fresh berries
- Iced tea
- Coffee
- Fruit salads
- Summer cookout meals
Serve chilled for maximum creaminess.
Storage Instructions
Refrigerator:
Store covered for 3–4 days.
Freezer:
Freeze individually wrapped bars for easy grab-and-serve desserts.
Make Ahead:
Prepare the day before serving for best results.
Recipe Card
No-Bake Lemon Cheesecake Bars
Yield: 6 servings
Prep Time: 15 minutes
Chill Time: 4 hours
Total Time: 4 hours 15 minutes
Ingredients
Crust
- 2 cups graham cracker crumbs
- ½ cup melted butter
- ½ teaspoon salt
Filling
- 2 packages lemon gelatin
- 1 cup boiling water
- 24 ounces cream cheese, softened
- Juice from 1 lemon
- Zest from 1 lemon
- 1½ cups powdered sugar
- 2 cups heavy whipping cream
Instructions
- Spray a 9×9-inch dish with non-stick spray.
- Mix crust ingredients together.
- Press crust into pan and refrigerate.
- Dissolve gelatin in boiling water and cool.
- Beat cream cheese and sugar until smooth.
- Add gelatin, lemon juice, zest, and cream.
- Beat until thickened.
- Spread filling over crust.
- Chill for at least 4 hours.
- Slice and serve.
Nutrition Information (Approximate Per Serving)
- Calories: 138
- Fat: 12g
- Saturated Fat: 6g
- Cholesterol: 234mg
- Sodium: 188mg
- Sugar: 10g
- Protein: 8g
Final Thoughts
No-Bake Lemon Cheesecake Bars are one of those desserts that effortlessly feel fancy while requiring very little work. They’re creamy, cool, bright, and ideal for nearly every occasion — from backyard gatherings to family dinners.
Best of all, they prove that incredible desserts don’t always require an oven. Sometimes all you need is a refrigerator, a handful of ingredients, and a little patience while the magic happens.