Introduction
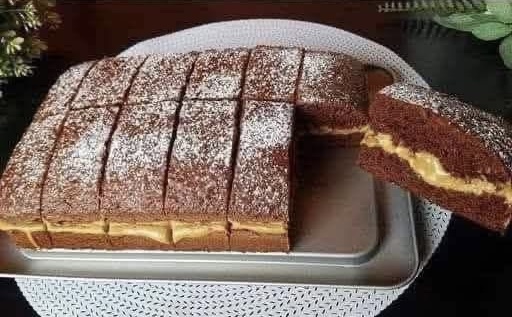
There’s something magical about the combination of chocolate and coffee. Rich cocoa paired with the deep aroma of coffee creates a flavor combination that feels luxurious yet comforting at the same time. If you’ve ever wished for a cake that’s incredibly soft, moist, and light enough to practically disappear with each bite, this Melt-In-Your-Mouth Mocha Cloud Cake is exactly what you need.
This cake earns its name honestly—it’s soft as a cloud, delicate in texture, and packed with a subtle mocha flavor that coffee lovers instantly fall for. Unlike dense chocolate cakes, this recipe creates an airy crumb that feels light while still delivering rich flavor. Whether you’re baking for a family gathering, an afternoon coffee break, or simply because you’re craving something sweet, this recipe is simple enough for beginners and impressive enough for special occasions.
What makes this mocha cake truly special is its balance. The coffee enhances the cocoa without overpowering it, while the oil and milk keep every slice moist for days. Top it with powdered sugar for simplicity or dress it up with chocolate glaze and whipped cream for a bakery-style dessert.
Let’s dive into this irresistible recipe.
Why You’ll Love This Mocha Cloud Cake
This recipe quickly becomes a favorite for many reasons:
- Super soft and fluffy texture
- Perfect balance of coffee and chocolate flavors
- Easy ingredients you probably already have at home
- Beginner-friendly recipe
- Delicious with coffee, tea, or milk
- Stays moist for several days
Whether served for breakfast, dessert, or an afternoon snack, this cake fits every occasion.
Ingredients
For the Cake
- 3 eggs
- A pinch of salt
- 8 g vanilla sugar
- 100 ml milk
- 1 tablespoon instant coffee
- 120 g granulated sugar
- 100 ml vegetable oil
- 180 g all-purpose flour
- 20 g unsweetened cocoa powder
- 15 g baking powder
Optional Toppings
- Powdered sugar
- Chocolate glaze
- Whipped cream
- Chocolate shavings
- Cocoa powder dusting
Kitchen Equipment Needed
Before starting, gather your tools:
- Large mixing bowl
- Whisk or electric mixer
- Measuring cups or kitchen scale
- Sifter
- Rubber spatula
- Cake pan (20–22 cm works well)
- Cooling rack
Preparing everything beforehand makes the baking process much smoother.
Step 1: Prepare the Coffee Mixture
The first step is creating the mocha base flavor.
Warm your milk slightly—not boiling, just warm enough to dissolve the coffee easily. Add one tablespoon of instant coffee into the milk and stir until completely dissolved.
Set this mixture aside while you prepare the other ingredients.
Why do this first? Allowing the coffee mixture to cool slightly prevents it from affecting the egg mixture later.
Step 2: Beat the Eggs and Sugar
Crack the eggs into a large mixing bowl.
Add:
- Sugar
- Vanilla sugar
- A pinch of salt
Whisk the ingredients together until the mixture becomes pale, fluffy, and slightly increased in volume.
This step is important because incorporating air into the eggs helps create the cake’s famous cloud-like texture.
If using an electric mixer, beat for about 3–4 minutes.
If whisking by hand, continue until the mixture looks light and airy.
Step 3: Add the Wet Ingredients
Slowly pour in:
- Vegetable oil
- Coffee-milk mixture
Mix gently until fully combined.
The vegetable oil is responsible for keeping the cake moist. Unlike butter cakes that can dry out after a day, oil-based cakes often stay softer longer.
You should now have a smooth, glossy mixture with a beautiful mocha aroma.
Step 4: Mix the Dry Ingredients
In a separate bowl, sift together:
- Flour
- Cocoa powder
- Baking powder
Sifting is more important than many people realize.
It helps:
- Remove lumps
- Evenly distribute ingredients
- Create a lighter cake texture
The cocoa powder should blend smoothly with the flour before being added to the wet mixture.
Step 5: Create the Batter
Gradually add the dry mixture into the wet ingredients.
Fold gently using a spatula or whisk.
Avoid overmixing.
Overmixing develops gluten, which can make cakes dense instead of fluffy.
Mix only until:
- No visible flour remains
- Batter looks smooth
- Texture becomes lump-free
The final batter should be silky and pourable.
Step 6: Prepare the Cake Pan
Grease your cake pan lightly with oil or butter.
You can also line the bottom with parchment paper for easier removal.
Pour the batter into the prepared pan and smooth the top.
Tap the pan gently on the counter to remove large air bubbles.
Step 7: Bake to Perfection
Preheat your oven to:
180°C (350°F)
Place the cake in the center rack.
Bake for:
30–35 minutes
Avoid opening the oven during the first 25 minutes.
To test for doneness:
Insert a toothpick into the center.
If it comes out clean or with a few crumbs, the cake is ready.
If wet batter sticks, bake a few more minutes.
Step 8: Cooling the Cake
Remove the cake from the oven.
Allow it to rest in the pan for about:
10–15 minutes
Then transfer it to a cooling rack.
Cooling properly prevents condensation from making the cake soggy.
Once cooled slightly, decorate as desired.
Optional Decoration Ideas
Powdered Sugar Finish
The easiest option.
Simply dust generously over the top for a classic bakery look.
Chocolate Glaze
For extra indulgence:
Mix melted chocolate with a little cream and drizzle over the cake.
Whipped Cream Topping
Add soft whipped cream for a light contrast to the chocolate flavor.
Chocolate Shavings
Sprinkle shaved chocolate for a professional finish.
You can even combine all four toppings for maximum dessert appeal.
Tips for the Softest Cake Ever
Use Room Temperature Eggs
Cold eggs don’t whip as effectively.
Room temperature ingredients mix better.
Don’t Skip Sifting
This creates lighter batter and better texture.
Measure Flour Correctly
Too much flour causes dryness.
Use a scale if possible.
Avoid Overbaking
A few extra minutes can remove moisture quickly.
Check early.
Flavor Variations
This recipe is versatile.
Try these twists:
Strong Mocha Version
Add an extra teaspoon of coffee.
Dark Chocolate Style
Use dark cocoa powder.
Nutty Mocha Cake
Fold chopped walnuts or hazelnuts into the batter.
Orange Mocha Cake
Add orange zest for brightness.
Filled Layer Cake
Slice horizontally and fill with cream.
How to Store Mocha Cloud Cake
At room temperature:
Store covered for up to 3 days.
In the refrigerator:
Keeps fresh for about 5–6 days.
For freezing:
Wrap slices individually and freeze for up to 2 months.
Allow thawing naturally before serving.
Serving Suggestions
This cake pairs beautifully with:
- Hot coffee
- Espresso drinks
- Cold milk
- Cappuccino
- Tea
- Vanilla ice cream
For special occasions, serve warm with whipped cream and chocolate sauce.
Frequently Asked Questions
Can I use brewed coffee instead?
Yes, but reduce the milk slightly to maintain balance.
Can I make it without cocoa powder?
You can, but it becomes more of a coffee cake than mocha cake.
Can I use butter instead of oil?
Yes, though oil gives softer results.
Why did my cake sink?
Usually from opening the oven early or underbaking.
Final Thoughts
Melt-In-Your-Mouth Mocha Cloud Cake is proof that simple ingredients can create extraordinary desserts. With its airy texture, rich mocha flavor, and foolproof method, this cake delivers comfort and elegance in every bite.
Whether you dust it lightly with powdered sugar or cover it with rich chocolate glaze, one thing is certain—this cake disappears quickly.
Bake it once, and it may become your new favorite chocolate coffee dessert.