Introduction
There’s something incredibly satisfying about baking your own bread. The aroma that fills your kitchen, the sound of a crackling crust as it cools, and the first slice slathered with butter—few things compare. But many people avoid bread-making because they think it requires complicated techniques, endless kneading, or expensive equipment.
This No-Knead Perfect Bread recipe changes everything.
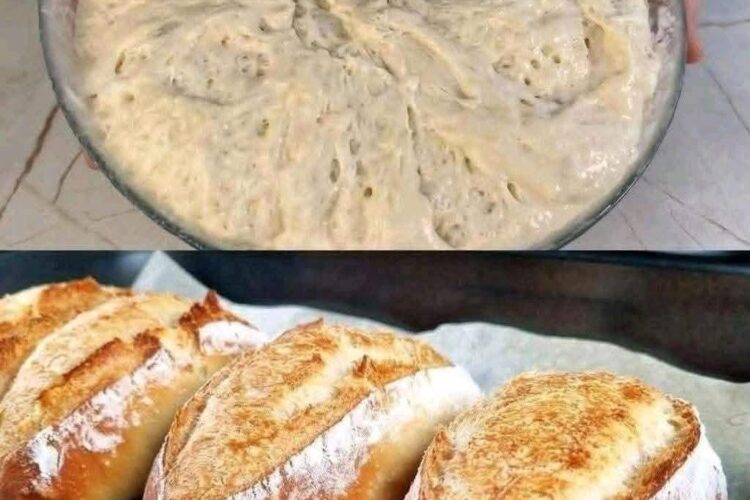
With just a handful of pantry staples and minimal hands-on work, you can create a bakery-style artisan loaf with a golden, crispy crust and a soft, airy interior. No mixer. No kneading. No advanced baking skills required.
This recipe is perfect for beginners, busy families, or anyone craving fresh homemade bread without spending hours in the kitchen. Whether you serve it with soup, use it for sandwiches, or simply enjoy it warm with butter, this rustic loaf delivers incredible results every single time.
Let’s bake the easiest homemade bread you’ll ever make.
Why You’ll Love This No-Knead Bread
This bread recipe has become popular for good reason:
- Requires minimal effort
- No kneading necessary
- Uses simple pantry ingredients
- Creates a bakery-quality crust
- Perfect for beginners
- Easy to customize with herbs or seeds
- Great for meal prep and freezing
The long resting time allows gluten to develop naturally, giving the bread its signature chewy texture and airy crumb without all the work.
Ingredients
For one rustic loaf, you’ll need:
Dough Ingredients:
- 1 tablespoon sugar
- 1 teaspoon dry yeast
- 250 ml (1 cup) lukewarm water
- 450 g flour (about 3½ cups)
- 1 teaspoon salt
- Optional: 1 tablespoon olive oil for extra softness
Ingredient Notes
Flour
Regular all-purpose flour works wonderfully for this recipe, but bread flour creates an even chewier texture. If you prefer whole wheat bread, replace up to 30% of the flour.
Yeast
Instant dry yeast or active dry yeast both work well. Fresh yeast can also be used if preferred.
Water Temperature Matters
Your water should feel warm but not hot—roughly 37–43°C (100–110°F). Water that’s too hot may kill the yeast.
Olive Oil
While optional, olive oil creates a softer crumb and slightly richer flavor.
Equipment You’ll Need
You don’t need fancy baking tools:
- Large mixing bowl
- Wooden spoon or spatula
- Plastic wrap or kitchen towel
- Parchment paper
- Dutch oven or heavy oven-safe pot with lid
- Cooling rack
Step-by-Step Instructions
Step 1: Activate the Yeast
Start by pouring the lukewarm water into a large bowl.
Add:
- Sugar
- Dry yeast
Stir gently and allow the mixture to sit for about 5–10 minutes.
You’ll know the yeast is ready when the surface becomes foamy and bubbly. This means the yeast is active and ready to work its magic.
If no foam appears, your yeast may be expired or your water may have been too hot or too cold.
Step 2: Make the Dough
Add the flour and salt to the bowl.
Using a spoon or spatula, mix everything together until no dry flour remains.
The dough should look:
- Sticky
- Rough
- Slightly shaggy
This is completely normal.
If using olive oil, add it now and mix until incorporated.
Unlike traditional bread recipes, resist the urge to knead. The sticky texture is exactly what creates those beautiful air pockets later.
Step 3: First Rise
Cover the bowl tightly using:
- Plastic wrap
- A lid
- Clean kitchen towel
Place it somewhere warm and allow it to rise for 1½–2 hours.
The dough should roughly double in size.
Optional Overnight Rise
For even more flavor:
Place the covered dough in the refrigerator for 8–12 hours.
This slow fermentation develops deeper flavor and improves texture.
Step 4: Shape the Dough
Lightly flour your countertop and hands.
Gently turn the dough onto the surface.
Avoid kneading.
Instead:
- Pull edges inward
- Fold them toward the center
- Rotate while shaping
Create a rough round loaf.
Transfer the dough onto parchment paper.
Cover lightly and allow it to rest for 30 minutes.
This resting period helps the dough relax and expand.
Step 5: Preheat the Oven
Place your Dutch oven (with lid) inside the oven.
Preheat to:
230°C (450°F)
Allow the pot to heat for at least 30 minutes.
This step is essential because the extremely hot pot creates steam, producing that signature artisan crust.
Step 6: Bake the Bread
Carefully remove the hot Dutch oven.
Using the parchment paper, lift the dough and lower it directly into the pot.
Cover immediately with the lid.
Bake:
- Covered: 30 minutes
- Uncovered: 10–15 minutes
The loaf is finished when:
- Deep golden brown
- Crispy crust forms
- Hollow sound when tapped underneath
Your kitchen should smell incredible by now.
Step 7: Cool Before Slicing
Transfer the bread onto a cooling rack.
Allow it to cool for at least 30 minutes.
This step matters.
Fresh bread continues cooking internally after leaving the oven. Cutting too early can make the inside gummy.
Patience rewards you with perfect slices.
Tips for Success
Don’t Add Too Much Flour
Sticky dough creates airy bread.
Adding excess flour can make the loaf dense.
Use a Hot Pot
The preheated Dutch oven is what creates professional bakery-style crust.
Longer Fermentation = More Flavor
Overnight refrigeration produces better texture and richer flavor.
Cool Completely
Warm bread is tempting, but cooling improves structure.
Delicious Variations
Customize your loaf with:
Herb Bread
Add:
- Rosemary
- Thyme
- Oregano
Garlic Bread Version
Mix in:
- Minced garlic
- Parmesan cheese
Seeded Bread
Sprinkle:
- Sesame seeds
- Pumpkin seeds
- Sunflower seeds
Cheesy Bread
Fold shredded cheese directly into the dough.
Serving Ideas
This bread pairs beautifully with:
- Soups and stews
- Pasta dishes
- Sandwiches
- Breakfast spreads
- Cheese boards
Or simply enjoy with:
- Butter
- Olive oil
- Jam
- Honey
Storage Instructions
Room Temperature
Store in a bread bag or wrapped in a towel for:
2–3 days
Freezing
Slice first, then freeze for:
Up to 3 months
Toast slices directly from frozen.
Frequently Asked Questions
Why is my bread dense?
Usually caused by:
- Too much flour
- Old yeast
- Not enough rise time
Can I make this without a Dutch oven?
Yes.
Use:
- Oven-safe pot with lid
- Baking stone with steam tray
- Covered casserole dish
Can I use whole wheat flour?
Yes, but replace only part of the flour for best texture.
Final Thoughts
Homemade bread doesn’t have to be difficult. This No-Knead Perfect Bread recipe proves that simple ingredients and a little patience can create bakery-quality results in your own kitchen.
Whether this is your first loaf or your hundredth, the crispy crust, fluffy interior, and incredible flavor make this recipe one you’ll return to again and again.
So grab a bowl, mix a few ingredients together, and discover just how easy artisan bread can be.