Introduction
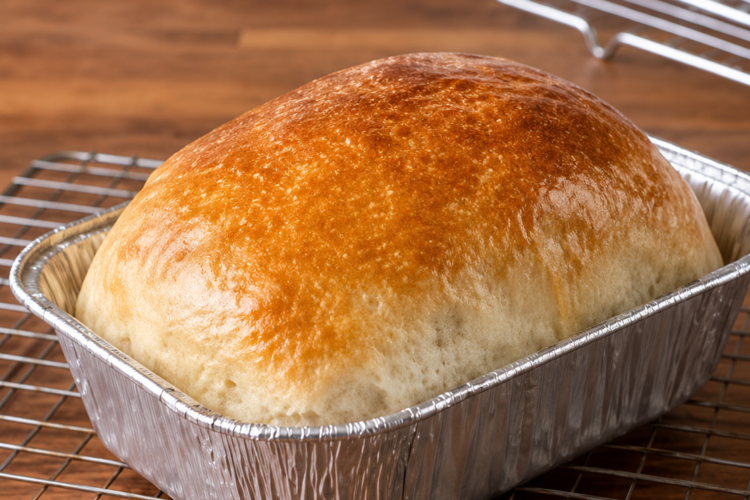
There’s something incredibly comforting about the smell of freshly baked bread drifting through the house. The warm aroma, the golden crust, and the soft interior create a baking experience that feels both nostalgic and rewarding. Yet for many people, making homemade bread can seem intimidating. Traditional bread recipes often involve sticky dough, messy countertops, and lengthy kneading sessions that discourage beginners from giving it a try.
Fortunately, there’s a simple solution that has transformed home baking for countless families: Bread in a Bag.
This clever bread-making method allows you to mix, knead, and begin proofing the dough right inside a sturdy zip-top bag. There’s no need for a stand mixer, minimal cleanup is required, and the entire process is surprisingly fun. Whether you’re a first-time baker, a busy parent, a college student, or simply someone who loves fresh bread without the hassle, this recipe is for you.
The beauty of Bread in a Bag lies in its simplicity. By using a plastic bag as your mixing bowl and kneading surface, you eliminate much of the mess associated with traditional bread making while still achieving a wonderfully soft and flavorful loaf. The result is a homemade bread that rivals bakery-quality loaves with a fraction of the effort.
Let’s dive into this foolproof recipe and discover why Bread in a Bag has become a favorite among home bakers everywhere.
Why You’ll Love This Recipe
This Bread in a Bag recipe offers several advantages:
- Perfect for beginners
- No stand mixer required
- Minimal cleanup
- Kid-friendly baking activity
- Soft, fluffy texture
- Budget-friendly ingredients
- Great for sandwiches, toast, and family meals
Once you try it, you’ll wonder why you ever thought bread baking was difficult.
Nutritional Information
Per Serving (Approximate Values)
- Calories: 180
- Protein: 6g
- Carbohydrates: 35g
- Fat: 2g
- Fiber: 1g
- Sodium: 280mg
Values may vary depending on ingredient brands and serving sizes.
Ingredients
For one standard loaf, you will need:
- 3 cups all-purpose flour
- 1 packet (2¼ teaspoons) active dry yeast
- 2 tablespoons granulated sugar
- 1 teaspoon salt
- 1 cup warm water (105–115°F / 40–46°C)
- 2 tablespoons olive oil or melted butter
- Extra flour for dusting
- Extra oil or butter for greasing
Essential Equipment
One of the best things about this recipe is how little equipment you need:
- Heavy-duty gallon-sized zip-top bag
- Measuring cups and spoons
- 9×5-inch loaf pan
- Wire cooling rack
- Kitchen towel or plastic wrap
Step-by-Step Instructions
Step 1: Activate the Yeast
Begin by pouring the warm water into a large zip-top bag. Add the sugar and yeast.
Seal the bag loosely and gently squeeze the contents until the sugar dissolves. Let the mixture rest for 5 to 10 minutes.
You’ll know the yeast is active when it becomes foamy and bubbly. This step is essential because it confirms that your yeast is alive and ready to help the dough rise.
Step 2: Add the Oil
Once the yeast mixture is foamy, add the olive oil or melted butter to the bag.
The oil helps create a softer crumb and enhances the overall flavor of the bread.
Step 3: Mix the Initial Dough
Add one cup of flour along with the salt.
Seal the bag, removing as much air as possible, then gently massage the ingredients together until a shaggy dough begins to form.
Don’t worry if the dough looks rough at this stage—this is completely normal.
Step 4: Add Remaining Flour
Gradually add the remaining flour, one cup at a time.
After each addition, reseal the bag and continue massaging until fully incorporated.
By the end, you should have a soft, slightly sticky dough ball.
Step 5: Knead the Dough
Now comes the fun part.
Without opening the bag, knead the dough by pressing, folding, and stretching it through the plastic.
Continue kneading for approximately 5 to 7 minutes.
You’ll notice the dough becoming smoother, more elastic, and easier to handle. This process develops the gluten, which gives bread its characteristic structure and chewiness.
Step 6: First Rise
Lightly grease the inside of the bag with oil.
Place the dough back into the bag and seal it loosely, leaving enough room for expansion.
Put the bag in a warm, draft-free location for 1 to 1½ hours, or until the dough doubles in size.
Good places include:
- A turned-off oven with the light on
- Near a sunny window
- A warm kitchen corner
Patience during this stage is rewarded with light, fluffy bread.
Step 7: Prepare the Loaf Pan
While the dough is rising, grease a 9×5-inch loaf pan.
This prevents sticking and ensures easy removal after baking.
Step 8: Shape the Loaf
Once the dough has doubled in size, gently press it down through the bag to release excess air.
Transfer it onto a lightly floured surface.
Flatten the dough into a rectangle, then tightly roll it into a loaf shape. Pinch the seam closed.
Place the loaf seam-side down into the prepared pan.
Step 9: Second Rise
Cover the loaf loosely with a clean towel or plastic wrap.
Allow it to rise for another 30 to 45 minutes.
The dough should nearly double again and rise slightly above the edge of the pan.
This second rise creates the light, airy texture that makes homemade bread so irresistible.
Step 10: Bake
Preheat your oven to 375°F (190°C).
Bake the loaf for 25 to 35 minutes until:
- The crust is golden brown
- The loaf sounds hollow when tapped
- The internal temperature reaches 200–210°F (93–99°C)
Your kitchen will soon be filled with the unmistakable aroma of freshly baked bread.
Step 11: Cool Completely
Remove the bread from the pan immediately and place it on a wire rack.
Allow it to cool completely before slicing.
While it may be tempting to cut into it right away, cooling helps the bread finish setting internally and prevents a gummy texture.
Expert Baking Tips
Use Fresh Yeast
Always check the expiration date on your yeast. Fresh yeast guarantees a strong rise and better texture.
Monitor Water Temperature
Water that’s too hot can kill yeast, while water that’s too cool may not activate it properly.
Aim for comfortably warm water between 105°F and 115°F.
Don’t Rush the Rising Process
Bread develops flavor and texture during proofing. Give it enough time to rise fully.
Measure Flour Correctly
Too much flour can result in a dense loaf.
For best results, spoon flour into your measuring cup and level it off instead of scooping directly from the bag.
Delicious Variations
Classic Butter Bread
For an extra-soft loaf, replace half the water with warm milk.
Before baking, brush the top with melted butter for a tender crust and rich flavor.
Whole Wheat Bread
For a healthier option, substitute 1 to 1½ cups of all-purpose flour with whole wheat flour.
You may need an extra tablespoon or two of water because whole wheat flour absorbs more moisture.
The result is a hearty loaf with a delicious nutty flavor.
Cinnamon Raisin Bread
Transform this recipe into a sweet breakfast favorite by adding:
- ½ cup raisins
- 1 to 2 teaspoons ground cinnamon
You can also increase the sugar slightly for added sweetness.
Before baking, sprinkle the top with cinnamon sugar for a bakery-style finish.
Herb and Cheese Bread
For a savory variation, add:
- 2 to 3 tablespoons dried herbs
- ½ cup shredded cheese
- 1 to 2 cloves minced garlic
This version pairs beautifully with soups, salads, and pasta dishes.
Storage Instructions
Room Temperature
Store cooled bread in:
- A bread box
- Airtight container
- Large zip-top bag
It will stay fresh for up to 2 days.
Freezing
For longer storage:
- Slice the bread completely.
- Place slices in a freezer-safe bag.
- Freeze for up to 3 months.
Individual slices can be toasted directly from frozen.
Reheating Tips
To refresh an entire loaf:
- Wrap in foil.
- Warm in a 350°F (175°C) oven.
- Heat for 10 to 15 minutes.
This method helps restore softness and freshness.
Frequently Asked Questions
Why Didn’t My Dough Rise?
Usually, inactive yeast or improper water temperature is the culprit.
Always proof the yeast first and ensure your rising environment is warm.
Why Is My Bread Dense?
Dense bread is often caused by:
- Insufficient kneading
- Not enough rising time
- Too much flour
Follow the measurements carefully and allow enough time for proofing.
Why Is My Bread Dry?
Dry bread typically results from overbaking.
Check the loaf a few minutes before the recommended baking time ends and avoid leaving it in the oven too long.
Can I Use Self-Rising Flour?
No.
Self-rising flour contains baking powder and salt, which work differently from yeast. This recipe specifically relies on active dry yeast to achieve its classic bread texture.
Final Thoughts
Bread in a Bag proves that homemade bread doesn’t have to be complicated. With a handful of pantry staples, a simple zip-top bag, and a little patience, you can create a soft, golden loaf that fills your home with warmth and incredible aroma.
Whether you’re baking for your family, teaching children the joy of bread making, or simply treating yourself to a slice of fresh homemade goodness, this easy method delivers delicious results every time. Once you experience the convenience and satisfaction of Bread in a Bag, it’s sure to become a regular part of your baking routine.