Introduction
There’s something incredibly comforting about the smell of apples and cinnamon baking in the oven. It fills the entire house with warmth and instantly brings back memories of cozy afternoons, family gatherings, and neighborhood bakeries. If you’ve ever visited a traditional bakery around Chicago, chances are you’ve spotted large trays of golden apple slices lined up behind the glass display case. Their flaky crust, generously filled apple center, and sweet vanilla glaze made them nearly impossible to resist.
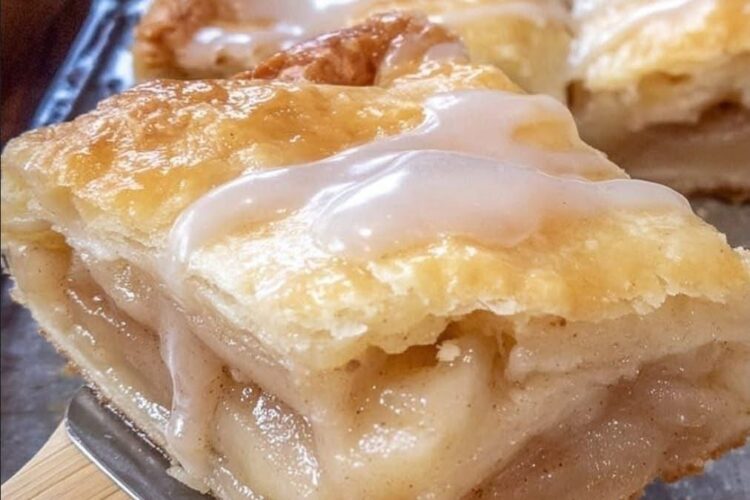
Unlike a traditional round apple pie, Chicago-Style Bakery Apple Slices are baked in a rectangular baking pan and cut into neat squares, making them perfect for sharing. They’re a beloved Midwestern classic that combines everything people love about homemade apple pie with the convenience of a bar dessert.
Each bite offers layers of buttery, flaky pastry wrapped around tender cinnamon-spiced apples. A simple vanilla glaze drizzled over the warm crust adds just enough sweetness without overpowering the natural apple flavor. Whether served warm with a scoop of vanilla ice cream or enjoyed alongside a hot cup of coffee, these apple slices are pure comfort food.
One of the best things about this recipe is its versatility. It’s elegant enough for holiday dinners yet simple enough to make on a relaxing weekend. They’re ideal for bake sales, potlucks, Thanksgiving, Christmas celebrations, family reunions, or simply satisfying a homemade dessert craving.
If you’ve been searching for an old-fashioned bakery-style apple dessert that’s easy to prepare and guaranteed to impress, you’ve found it. Let’s bake a timeless favorite that tastes just like it came from a classic Chicago bakery.
Why You’ll Love These Chicago-Style Apple Slices
This recipe has remained popular for generations because it offers everything you want in a homemade dessert.
- Classic bakery flavor with a nostalgic homemade touch.
- Buttery, flaky pastry that practically melts in your mouth.
- Sweet and tart apple filling perfectly balanced with warm spices.
- Easy-to-cut squares that are perfect for serving a crowd.
- Great for holidays, family dinners, potlucks, and bake sales.
- Can be prepared ahead of time.
- Delicious warm, chilled, or at room temperature.
Every slice captures the comforting flavors of traditional apple pie while being much easier to serve.
Ingredients
For the Crust
- 3 cups all-purpose flour
- 1 tablespoon granulated sugar
- 1 teaspoon salt
- 1 cup cold unsalted butter, cubed
- 2 large eggs
- 5–6 tablespoons cold water
For the Apple Filling
- 8 cups apples (about 6–8 apples), peeled, cored, and thinly sliced
- ¾ cup granulated sugar
- ¼ cup packed light brown sugar
- 2 tablespoons all-purpose flour
- 1 teaspoon ground cinnamon
- ¼ teaspoon ground nutmeg
- 1 tablespoon fresh lemon juice
- 1 tablespoon melted unsalted butter
For the Vanilla Glaze
- 1 cup powdered sugar
- 2–3 tablespoons milk
- ½ teaspoon vanilla extract
Kitchen Equipment
You’ll need:
- 9×13-inch baking pan
- Large mixing bowl
- Medium mixing bowl
- Rolling pin
- Pastry cutter or food processor
- Measuring cups and spoons
- Sharp knife
- Cooling rack
- Whisk
Step-by-Step Instructions
Step 1: Prepare the Dough
In a large mixing bowl, whisk together the flour, sugar, and salt.
Add the cold cubed butter and use a pastry cutter or your fingertips to cut it into the flour until the mixture resembles coarse crumbs with pea-sized butter pieces remaining.
In another bowl, whisk together the eggs and 5 tablespoons of cold water. Gradually stir the wet ingredients into the flour mixture until a dough begins to form. If the dough feels dry, add another tablespoon of cold water.
Divide the dough into two equal portions, shape each into a disk, wrap tightly in plastic wrap, and refrigerate for at least 30 minutes.
Chilling the dough allows the butter to stay cold, creating beautifully flaky layers during baking.
Step 2: Prepare the Baking Pan
Preheat your oven to 375°F (190°C).
Lightly grease a 9×13-inch baking pan with butter or nonstick cooking spray.
Step 3: Make the Apple Filling
Peel, core, and thinly slice the apples.
Place them into a large bowl and add:
- Granulated sugar
- Brown sugar
- Flour
- Cinnamon
- Nutmeg
- Lemon juice
Gently toss everything together until every apple slice is evenly coated with the sweet spice mixture.
The flour will help thicken the filling as it bakes, preventing excess liquid from making the crust soggy.
Step 4: Assemble the Apple Slices
Lightly flour your work surface.
Roll one portion of chilled dough into a rectangle slightly larger than your baking pan.
Carefully transfer it into the prepared pan, pressing it gently into the corners.
Spread the apple filling evenly over the crust.
Drizzle the melted butter over the apples.
Roll out the second portion of dough and carefully place it over the filling.
Seal the edges by pressing them together with your fingers or a fork.
Using a sharp knife, cut several small slits across the top crust to allow steam to escape while baking.
Step 5: Bake
Place the pan in the preheated oven.
Bake for 40 to 45 minutes, or until the crust is beautifully golden brown and the apples are soft and tender.
If the edges begin browning too quickly, loosely cover them with aluminum foil during the last 15 minutes.
Allow the dessert to cool slightly before glazing.
Step 6: Prepare the Vanilla Glaze
In a small bowl, whisk together:
- Powdered sugar
- Milk
- Vanilla extract
Mix until completely smooth.
Drizzle the glaze over the warm apple slices.
Allow it to set for about 10 minutes before slicing into squares.
Serve warm or at room temperature.
Expert Tips for Perfect Apple Slices
A few simple techniques can make a big difference.
Use multiple apple varieties. Combining tart Granny Smith apples with sweeter varieties like Honeycrisp or Fuji creates a more complex flavor.
Keep the butter cold. Cold butter produces flaky pastry layers that resemble bakery-quality crust.
Don’t overwork the dough. Mix just until everything comes together to keep the crust tender.
Slice apples evenly. Uniform slices ensure consistent baking.
Vent the top crust. Steam needs somewhere to escape to prevent the pastry from becoming soggy.
Allow cooling time. Letting the dessert rest before slicing helps the filling set properly.
Delicious Variations
One of the reasons this recipe is so popular is how easy it is to customize.
Apple and Pear
Replace half of the apples with ripe pears for a softer, sweeter filling.
Cinnamon Glaze
Add ½ teaspoon of cinnamon to the glaze for extra warmth.
Nut Lover’s Version
Sprinkle chopped walnuts or pecans over the apple filling before adding the top crust.
Caramel Apple Slices
Drizzle caramel sauce over each serving for an indulgent dessert.
Cranberry Apple
Add one cup of fresh cranberries to create a festive holiday version.
Individual Apple Squares
Bake the recipe in muffin tins or mini baking dishes for personal-sized desserts.
Serving Suggestions
These bakery apple slices are incredibly versatile.
Serve them with:
- Vanilla ice cream
- Fresh whipped cream
- Salted caramel sauce
- Hot coffee
- Black tea
- Chai latte
- Warm apple cider
- Cinnamon ice cream
They’re equally delicious for dessert, brunch, or an afternoon snack.
Storage Instructions
Room Temperature
Store covered for up to 2 days.
Refrigerator
Keep refrigerated in an airtight container for up to 5 days.
Freezer
Freeze individual slices in airtight containers or freezer bags for up to 2 months.
Thaw overnight in the refrigerator before reheating.
Make-Ahead Tips
These apple slices are perfect for preparing in advance.
You can:
- Make the dough one day ahead.
- Prepare the filling several hours early.
- Assemble everything and refrigerate before baking.
- Bake the entire dessert a day ahead and glaze before serving.
In fact, many people think the flavors become even better the next day.
Frequently Asked Questions
Can I use store-bought pie crust?
Absolutely. Two refrigerated pie crusts make this recipe quicker while still producing delicious results.
Which apples are best?
A combination of tart and sweet apples works best. Granny Smith, Honeycrisp, Fuji, Braeburn, and Pink Lady are all excellent choices.
Can I freeze them?
Yes. Bake the slices completely, cool them, then freeze for up to two months. Reheat before serving for the best texture.
How should I reheat leftovers?
Warm slices in a 325°F oven for about 10 minutes or microwave individual portions for 20–30 seconds.
Can I double the recipe?
Definitely. Double the ingredients and bake in a large sheet pan for parties, holidays, or bake sales.
Can I add raisins?
Certainly. A handful of raisins or dried cranberries adds wonderful texture and sweetness.
Why is my bottom crust soggy?
Too much moisture from the apples can soften the crust. For extra crispness, blind bake the bottom crust for about 10 minutes before adding the filling.
Final Thoughts
Chicago-Style Bakery Apple Slices are more than just another apple dessert—they’re a cherished tradition that has been enjoyed for generations. Their flaky homemade crust, tender cinnamon-spiced apples, and delicate vanilla glaze create the perfect balance of rustic comfort and bakery-quality flavor.
Whether you’re baking for Thanksgiving, Christmas, a neighborhood potluck, or simply craving a nostalgic homemade treat, this recipe is sure to become one you’ll make again and again. Every square delivers the comforting taste of old-fashioned baking and reminds us that the simplest desserts are often the most memorable.
Gather your favorite apples, roll out that buttery crust, and enjoy the timeless charm of this beloved Chicago bakery classic. One bite is all it takes to understand why these apple slices have remained a family favorite for decades.