Introduction
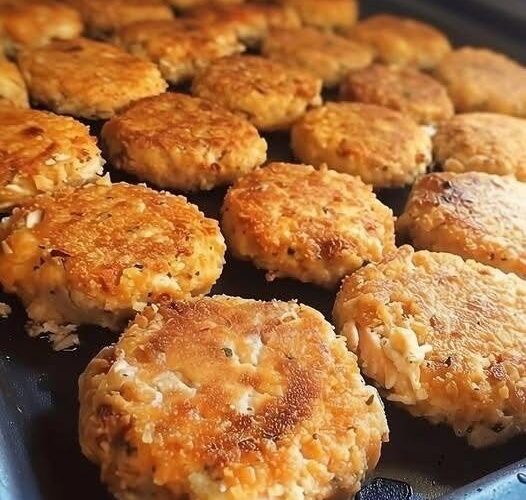
There’s something incredibly comforting about recipes that turn simple pantry staples into something unforgettable. These crispy salmon pancakes are exactly that kind of dish — affordable, easy to prepare, and packed with savory flavor in every bite. Whether you grew up eating salmon patties at family dinners or you’re discovering them for the first time, this recipe offers the perfect balance of crispy edges, tender centers, and rich salmon flavor.
One of the best things about salmon pancakes is how versatile they are. They work beautifully as a quick lunch, an easy weeknight dinner, or even a hearty breakfast served with eggs. Because they use canned pink salmon, they’re also budget-friendly and convenient, making them ideal for busy households.
These old-fashioned salmon pancakes require only a handful of ingredients that you probably already have in your kitchen. In less than 30 minutes, you’ll have golden, crispy cakes ready to serve with your favorite dipping sauce or side dishes.
If you’ve never tried salmon pancakes before, prepare to add a new comfort-food favorite to your meal rotation.
Why You’ll Love These Salmon Pancakes
These crispy salmon pancakes are popular for many reasons:
- Quick and easy to prepare
- Made with affordable pantry ingredients
- Crispy on the outside and tender inside
- High in protein and filling
- Perfect for meal prep
- Great for breakfast, lunch, or dinner
- Kid-friendly and customizable
Unlike complicated seafood recipes, these pancakes come together with minimal effort while delivering maximum flavor.
Ingredients You’ll Need
For this recipe, gather the following ingredients:
Main Ingredients:
- 1 can pink salmon, drained, skinless, and boneless
- 2 tablespoons chopped onion
- Salt, to taste
- Black pepper, to taste
- 1 large egg
- 1 tablespoon milk
- 2 tablespoons cornmeal
- 4 teaspoons all-purpose flour
- Vegetable oil for frying
Ingredient Notes and Substitutions
Canned Pink Salmon
Pink salmon works perfectly because it’s affordable and already cooked. Make sure to drain it thoroughly before mixing to avoid excess moisture.
Onion
Fresh chopped onion adds texture and flavor. You can substitute green onions if preferred.
Cornmeal
Cornmeal gives these pancakes their signature texture and extra crispiness.
Flour
The flour helps hold everything together while creating a sturdy pancake.
Milk
Milk adds moisture to the mixture. You can substitute water if necessary.
Kitchen Equipment Needed
You won’t need much for this recipe:
- Mixing bowl
- Fork or spoon
- Measuring spoons
- Cast iron skillet or frying pan
- Spatula
- Paper towels
A cast iron skillet works especially well because it creates an evenly crispy crust.
How to Make Salmon Pancakes
Step 1: Prepare the Salmon Mixture
Drain your canned salmon thoroughly and place it in a medium mixing bowl.
Use a fork to gently break apart larger chunks.
Add:
- Chopped onion
- Salt
- Pepper
Mix until evenly combined.
Step 2: Add the Binding Ingredients
Crack the egg into the bowl.
Pour in the milk.
Add:
- Cornmeal
- Flour
Mix everything together thoroughly until a thick batter forms.
The mixture should hold together easily when scooped.
If it feels too wet, add a small amount of flour.
If too dry, add a splash of milk.
Step 3: Heat the Oil
Place a cast iron skillet over medium heat.
Add enough vegetable oil to lightly coat the bottom of the pan.
Allow the oil to heat for several minutes.
To test readiness, drop in a tiny amount of batter — it should sizzle immediately.
Step 4: Form the Pancakes
Using a tablespoon, scoop portions of the salmon mixture into the hot skillet.
Flatten each scoop slightly using the back of the spoon.
Avoid overcrowding the pan.
Leave enough room between pancakes for easy flipping.
Step 5: Fry Until Golden Brown
Cook each pancake for approximately 1 minute per side.
Watch for:
- Golden brown edges
- Crispy exterior
- Firm texture
Carefully flip and cook the second side.
Step 6: Drain Excess Oil
Transfer cooked pancakes onto paper towels or a paper bag.
Allow excess oil to drain for several minutes.
Serve while hot and crispy.
Tips for Perfect Salmon Pancakes
Drain the Salmon Well
Too much liquid creates soggy pancakes.
Always drain canned salmon thoroughly.
Don’t Skip the Cornmeal
Cornmeal provides texture and crispiness.
Keep Heat Moderate
Too much heat burns the outside before the center cooks.
Medium heat works best.
Avoid Overmixing
Mix only until ingredients combine.
Overmixing can make the pancakes dense.
What to Serve with Salmon Pancakes
These pancakes pair well with many side dishes.
Some favorites include:
Breakfast Pairings
- Fried eggs
- Toast
- Fresh fruit
- Hash browns
Lunch Options
- Green salad
- Coleslaw
- Rice
- Roasted vegetables
Dinner Ideas
- Mashed potatoes
- Macaroni and cheese
- Corn on the cob
- Steamed vegetables
Sauce Ideas
Adding sauce takes these salmon pancakes to another level.
Try serving them with:
- Tartar sauce
- Lemon aioli
- Garlic mayo
- Sour cream
- Hot sauce
- Honey mustard
A squeeze of fresh lemon also works beautifully.
Storage Instructions
Refrigerator
Store leftovers in an airtight container.
Keep refrigerated for up to 3 days.
Freezer
Freeze cooked pancakes individually.
Store for up to 2 months.
Separate layers with parchment paper.
Reheating Instructions
For best texture:
Skillet Method
Heat over medium heat for 2–3 minutes per side.
Air Fryer
Cook at 350°F for 3–4 minutes.
Oven
Bake at 350°F for about 10 minutes.
Avoid microwaving if possible since it softens the crust.
Recipe Variations
Cheesy Salmon Pancakes
Add shredded cheddar cheese.
Spicy Version
Mix in cayenne pepper or hot sauce.
Herb Version
Add parsley, dill, or green onions.
Extra Crunchy
Add extra cornmeal.
Frequently Asked Questions
Can I use fresh salmon?
Yes. Cook and flake fresh salmon first.
Can I bake these instead of frying?
Yes. Bake at 400°F for about 15–18 minutes.
Why are my pancakes falling apart?
Usually the mixture needs more flour or an extra egg.
Can I make them ahead?
Yes. Prepare the mixture several hours ahead and refrigerate.
Final Thoughts
These crispy salmon pancakes prove that simple ingredients often create the most satisfying meals. They’re inexpensive, fast, and incredibly flavorful — making them perfect for busy weekdays or cozy weekend meals.
The crispy outside combined with the soft, savory interior creates a texture that keeps people coming back for seconds. Once you try this recipe, it may quickly become one of your favorite comfort foods.
Serve them fresh, experiment with sauces, and enjoy every crispy bite.
Happy cooking!