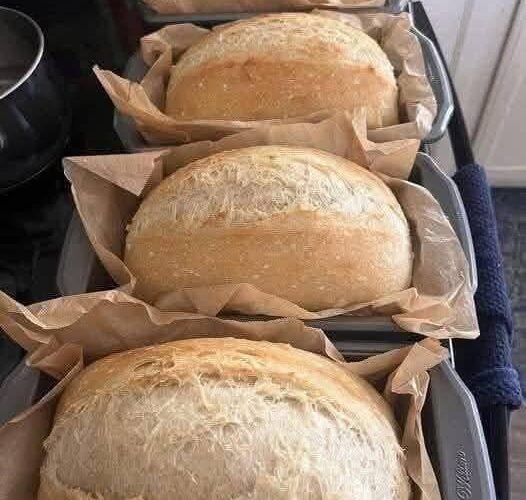
There’s something magical about pulling a fresh loaf of homemade bread from the oven. The golden crust crackles as it cools, the warm aroma fills the kitchen, and suddenly your entire house feels cozy and inviting. If you’ve ever thought making bakery-style bread at home was complicated, this Crusty Italian Bread recipe is about to completely change your mind.
This recipe is one of those unforgettable kitchen moments — the kind where you take a bite and can hardly believe you made it yourself. The crust is beautifully crisp with just the right amount of chew, while the inside stays soft, fluffy, and tender. It tastes like something from an artisan bakery, yet it’s made with simple pantry ingredients and almost no effort.
Even better? There’s no complicated kneading process involved. That’s right — no endless kneading, no fancy equipment, and no intimidating bread techniques. All you need is flour, yeast, water, olive oil, salt, and a little patience while the dough rises. The result is rustic Italian bread that’s perfect for sandwiches, soups, pasta nights, garlic bread, or simply sliced warm with butter.
Once you try this recipe, you’ll want to make it again and again. The dough is incredibly versatile too. You can use it to make crusty dinner rolls, pizza dough, or even breadsticks. It’s one of those dependable recipes every home baker should keep in their collection.
Why You’ll Love This Crusty Italian Bread
This bread recipe has become a favorite for so many reasons:
- Easy enough for beginners
- No kneading required
- Uses simple pantry staples
- Creates a bakery-style crust
- Soft and airy interior
- Perfect for freezing
- Great for sandwiches or dipping
- Versatile dough for rolls and pizza
If you’ve been nervous about making homemade bread, this recipe is the perfect place to start.
What Makes Italian Bread So Good?
Traditional Italian bread is known for its crisp crust and soft, airy crumb. The secret usually lies in a high-moisture dough and steam during baking. In this recipe, a shallow pan of hot water placed in the oven creates steam that helps develop that gorgeous crusty exterior.
The steam keeps the outer layer soft during the first stage of baking, allowing the bread to rise beautifully before the crust hardens into that signature crispy finish.
It’s a simple bakery trick that makes a huge difference.
Ingredients You’ll Need
This recipe makes two beautiful loaves.
For the Bread Dough
- 1 1/3 cups warm water
- 2 1/4 teaspoons active dry yeast
- 1 tablespoon brown sugar
- 1 1/2 teaspoons salt
- 1 1/2 teaspoons olive oil
- 4 cups all-purpose flour
For the Egg Wash
- 1 egg
- 1 tablespoon water
Optional:
- Butter for brushing over the hot crust after baking
Ingredient Notes
Warm Water
The water should be warm but not hot — around 105°F to 110°F is ideal. Water that’s too hot can kill the yeast, while cold water won’t activate it properly.
Yeast
Active dry yeast works perfectly in this recipe. Instant yeast can also be used.
Brown Sugar
The sugar feeds the yeast and helps the bread rise beautifully while adding a subtle depth of flavor.
Olive Oil
Olive oil adds richness and softness to the dough.
Flour
All-purpose flour creates a wonderful texture, but bread flour can also be used for an even chewier loaf.
How To Make Crusty Italian Bread
Step 1: Activate the Yeast
In a large mixing bowl, combine the warm water, yeast, and brown sugar. Stir gently and let the mixture sit for about 5 minutes.
You’ll notice bubbles and foam forming on the surface. This means the yeast is active and ready to use.
If nothing happens after several minutes, your yeast may no longer be fresh.
Step 2: Mix the Dough
Add the olive oil and salt to the yeast mixture.
Gradually add the flour, mixing as you go. Continue adding flour until the dough begins pulling away from the sides of the bowl.
If using a stand mixer, mix with the dough hook attachment for a few minutes until the dough becomes smooth.
The dough should feel soft and slightly sticky, but manageable.
Step 3: Let the Dough Rise
Cover the bowl with a clean towel or plastic wrap and place it in a warm spot.
Allow the dough to rise until doubled in size, about 30 minutes to 1 hour depending on room temperature.
Watching bread dough rise is one of the most satisfying parts of baking.
Step 4: Shape the Loaves
Punch down the dough gently to release excess air.
Divide the dough into two equal portions and shape each into a loaf.
Place the loaves onto a greased baking sheet or a parchment-lined baking pan.
Cover with a damp cloth and allow them to rise again until doubled in size.
This second rise helps create that light and airy interior.
Step 5: Prepare the Egg Wash
In a small bowl, whisk together:
- 1 egg
- 1 tablespoon water
Brush the tops of the loaves gently with the egg mixture. This gives the bread a shiny golden finish.
Using a sharp knife, make one long slit down the center of each loaf.
This helps control expansion while baking and gives the bread its classic artisan appearance.
Step 6: Create Steam in the Oven
Preheat your oven to 375°F.
Place a shallow baking pan on the lower oven rack and carefully pour in at least 1 cup of hot water.
This step is the secret to achieving a perfectly crusty loaf.
The steam helps create that irresistible crunchy crust while keeping the inside soft and fluffy.
Make sure the water doesn’t fully evaporate during baking. Add more if needed.
Step 7: Bake the Bread
Bake the loaves for 25 to 30 minutes or until golden brown.
The bread should sound hollow when tapped on the bottom.
Once baked, transfer the loaves to a wire rack to cool slightly.
For extra flavor and softness, rub butter over the hot crust while the bread is still warm.
That buttery finish takes this bread completely over the top.
Tips For Perfect Homemade Bread
Don’t Add Too Much Flour
One of the biggest bread-making mistakes is adding excess flour. The dough should remain slightly sticky for the softest texture.
Use Fresh Yeast
Expired yeast won’t rise properly. Always check the expiration date before baking.
Create a Warm Rising Environment
If your kitchen is cold, place the dough inside an oven that’s turned off but slightly warm.
Use Steam
The pan of hot water truly transforms the crust. Don’t skip this step.
Delicious Ways To Serve Crusty Italian Bread
This bread pairs beautifully with almost anything.
Serve It With:
- Pasta dishes
- Soups and stews
- Olive oil and balsamic vinegar
- Garlic butter
- Cheese boards
- Sandwiches
- Bruschetta
- Toasted with jam
Warm slices fresh from the oven with melted butter might be the best way of all.
Can You Freeze Homemade Bread?
Absolutely.
Allow the bread to cool completely, then wrap tightly in plastic wrap and foil.
Freeze for up to 3 months.
To reheat, thaw at room temperature and warm in the oven at 350°F for about 10 minutes.
The crust crisps right back up beautifully.
Can This Dough Be Used For Other Recipes?
Yes! This dough is incredibly versatile.
You can use it to make:
- Crusty dinner rolls
- Homemade pizza dough
- Breadsticks
- Focaccia-style bread
- Sandwich rolls
It’s one of those reliable dough recipes that works for so many meals.
Frequently Asked Questions
Why Is My Bread Dense?
Dense bread usually happens when too much flour is added or the dough hasn’t risen long enough.
Why Didn’t My Dough Rise?
Your yeast may be expired, or the water temperature may have been too hot or too cold.
How Do I Make the Crust Even Crunchier?
Bake with steam and allow the bread to cool uncovered on a wire rack.
Final Thoughts
There’s nothing quite like homemade bread, especially when it’s this simple to make. This Crusty Italian Bread recipe delivers everything you could want in a rustic artisan loaf: a crunchy golden crust, a soft fluffy center, and rich homemade flavor.
Whether you’re serving it alongside pasta, using it for sandwiches, or enjoying a warm slice with butter, this bread is guaranteed to impress. The best part is how incredibly easy it is. No complicated techniques. No endless kneading. Just simple ingredients coming together to create something truly special.
Once you make this recipe, don’t be surprised if it becomes a regular part of your weekly baking routine. One bite of this warm, crusty bread and you’ll understand exactly why everyone loves it so much.