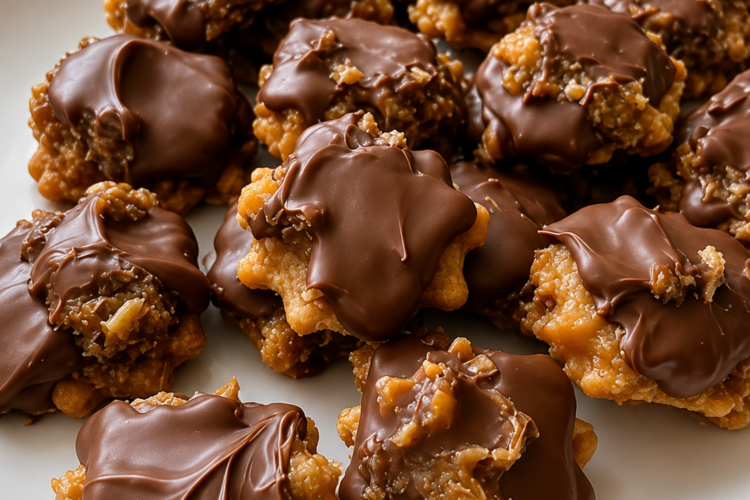
There’s always that one dessert that disappears before anything else at family gatherings. In my house, it’s these Easy No-Bake Caramel Chocolate Candy Clusters. I first made them during a busy holiday season when I wanted something homemade but didn’t have hours to spend in the kitchen. After one batch, they became a tradition.
What makes these little treats so irresistible? Imagine crunchy toasted pecans wrapped in soft, buttery caramel, mixed with crispy rice cereal for extra crunch, then coated in smooth chocolate that snaps perfectly with every bite. They look like fancy candy shop creations, but they’re surprisingly easy to make.
The best part is that you don’t need complicated techniques, candy thermometers, or special equipment. This recipe is simple enough for beginners but impressive enough for gift boxes, holiday platters, bake sales, or weekend treats.
If you love chocolate, caramel, and easy recipes that always impress, these no-bake caramel chocolate clusters deserve a place in your recipe collection.
Why You’ll Love These No-Bake Candy Clusters
There are plenty of homemade candy recipes out there, but this one works because of its balance of textures and flavors.
These clusters combine:
- Smooth, buttery caramel
- Crunchy toasted pecans
- Crispy cereal pieces
- Rich chocolate coating
- Sweet and salty contrast
Unlike traditional caramel clusters that can sometimes become too sticky or difficult to chew, the addition of crisped rice cereal creates a lighter texture that makes every bite more enjoyable.
These candies are:
- No-bake
- Beginner-friendly
- Perfect for gifting
- Easy to customize
- Great for holidays and parties
- Make-ahead friendly
Whether you’re making them for Christmas trays, birthday parties, or just because you need chocolate, they fit almost every occasion.
Equipment You’ll Need
One reason this recipe is so popular is because it requires minimal kitchen equipment.
Gather these items before starting:
- Medium saucepan
- Silicone spatula or wooden spoon
- Baking sheet or tray
- Parchment paper or wax paper
- Microwave-safe bowl
- Fork or dipping tool
- Measuring cups
- Airtight storage container
That’s it — no candy molds or specialty tools required.
Ingredients
For the Caramel Crunch Centers
- 2 cups caramel baking nibs (or soft unwrapped caramels)
- 2 tablespoons water
- 1½ cups chopped pecans
- 1½ cups crisped rice cereal
For the Chocolate Coating
- 2½ cups semi-sweet chocolate chips
- 1 tablespoon vegetable shortening
Optional Toppings
- Flaky sea salt
- White chocolate drizzle
- Crushed nuts
- Holiday sprinkles
Why These Ingredients Work So Well Together
Each ingredient plays an important role in creating the perfect candy texture.
Caramel
Caramel provides the chewy center and rich buttery flavor. Adding water while melting prevents it from becoming too stiff.
Pecans
Pecans bring nutty flavor and richness. Toasting them first makes a noticeable difference because it deepens their flavor.
Crisped Rice Cereal
This ingredient changes everything. It creates air pockets in the filling, making the clusters lighter and easier to bite.
Chocolate
Semi-sweet chocolate balances the sweetness of caramel while adding a smooth finish.
Vegetable Shortening
A small amount improves dipping consistency and gives the chocolate coating a glossy appearance.
Step-by-Step Instructions
Step 1: Prepare Your Workspace
Line a baking sheet or tray with parchment paper.
Measure all ingredients beforehand because once the caramel melts, you’ll want to move quickly.
Having everything ready makes the process much easier.
Step 2: Melt the Caramel Slowly
Place caramel pieces and water in a saucepan.
Heat over very low heat.
Stir continuously until completely smooth.
Avoid increasing the heat because caramel can burn quickly and develop an unpleasant taste.
Patience is important here.
Once melted, remove from heat immediately.
Step 3: Add the Crunchy Ingredients
While the caramel is still warm:
- Add chopped pecans
- Add crisped rice cereal
Mix thoroughly until everything becomes evenly coated.
You’ll notice the mixture becoming thicker as the cereal absorbs some of the caramel.
This is exactly what you want.
Step 4: Form the Clusters
Using a spoon or cookie scoop, place tablespoon-sized portions onto the lined baking sheet.
Don’t worry about making them perfectly shaped.
Rustic clusters actually look more homemade and inviting.
If the mixture feels too soft, allow it to cool for a minute or two before scooping.
Place the tray into the refrigerator.
Chill for 30–45 minutes until firm.
Step 5: Melt the Chocolate
Add chocolate chips and shortening to a microwave-safe bowl.
Heat in 15-second intervals.
Stir between every interval.
Continue until smooth and shiny.
Avoid overheating because burnt chocolate becomes thick and difficult to work with.
Step 6: Dip the Clusters
Remove chilled caramel centers from the refrigerator.
Using a fork, lower each cluster into melted chocolate.
Lift and tap gently to remove excess coating.
Place back onto parchment paper.
If using sea salt or toppings, sprinkle immediately before the chocolate sets.
Step 7: Chill Until Firm
Return clusters to the refrigerator.
Allow about 20 minutes for the chocolate shell to harden completely.
Once firm, they’re ready to enjoy.
Tips for Perfect Candy Clusters Every Time
Toast Your Pecans
Five minutes in the oven creates deeper flavor and extra crunch.
Work Slowly with Chocolate
Short heating intervals prevent overheating.
Chill Completely Before Dipping
Warm centers can melt into the chocolate coating.
Use Good Chocolate
Better chocolate creates smoother coatings and richer flavor.
Let Them Rest Before Serving
Allow candies to sit at room temperature for 10–15 minutes for the best texture.
Fun Variations to Try
One reason I keep returning to this recipe is how easy it is to customize.
Dark Chocolate Version
Swap semi-sweet for dark chocolate.
Peanut Lovers Version
Replace pecans with peanuts.
White Chocolate Drizzle
Create bakery-style decoration with melted white chocolate.
Salted Caramel Clusters
Finish with flaky sea salt.
Holiday Version
Add festive sprinkles before the coating sets.
Gluten-Free Option
Simply use gluten-free crisped rice cereal.
Storage Instructions
These candies store beautifully.
Refrigerator
Store in airtight containers.
Separate layers with wax paper.
Shelf life:
Up to 3 weeks.
Freezer
Freeze for up to 3 months.
Place parchment between layers to prevent sticking.
Serving Tip
Remove from refrigeration about 15 minutes before eating.
The caramel becomes softer and more enjoyable.
Avoid microwaving finished candies because it can ruin the chocolate coating.
Frequently Asked Questions
Why Did My Chocolate Become Thick?
Chocolate usually thickens from overheating or moisture contamination.
Keep bowls completely dry and heat slowly.
Can I Use Wrapped Caramels?
Yes.
Simply unwrap and melt them exactly the same way.
Why Did My Clusters Spread?
Your caramel mixture was likely too warm.
Let it cool briefly before scooping.
Can I Make These Ahead?
Absolutely.
They’re excellent make-ahead desserts because they store so well.
Do I Need a Candy Thermometer?
No.
That’s one reason this recipe is so beginner-friendly.
Final Thoughts
These Easy No-Bake Caramel Chocolate Candy Clusters prove that homemade candy doesn’t have to be complicated. With crunchy nuts, chewy caramel, crispy cereal, and silky chocolate, every bite delivers layers of texture and flavor.
Whether you’re making holiday treats, edible gifts, party desserts, or simply satisfying a chocolate craving, these clusters always feel special.
Once you make your first batch, don’t be surprised if they become your most requested dessert too.