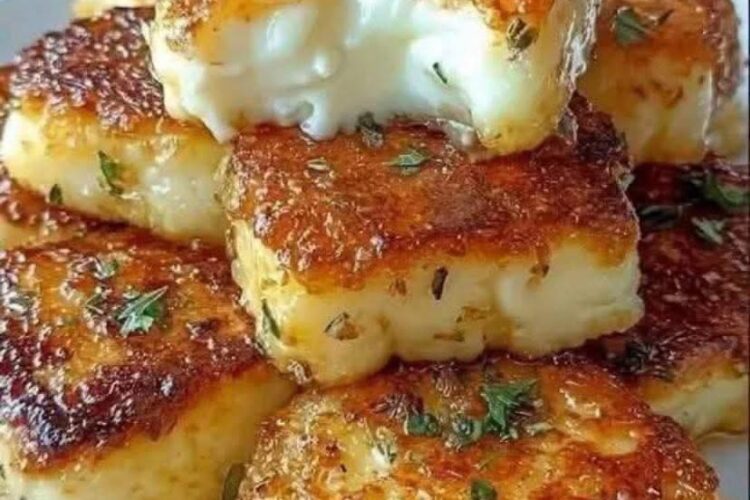
If you’re looking for a quick, satisfying appetizer or side dish that feels gourmet without requiring hours in the kitchen, this Pan-Fried Halloumi is exactly what you need. Made with just three simple ingredients, this recipe transforms a block of halloumi cheese into crispy, golden slices with a soft, chewy center that is absolutely irresistible.
Halloumi is one of those special cheeses that holds its shape when heated, making it perfect for frying or grilling. Unlike many other cheeses that melt into a puddle, halloumi develops a beautifully crisp exterior while remaining deliciously tender inside. Whether you’re serving it as a snack, adding it to salads, or pairing it with fresh vegetables, it’s guaranteed to impress.
The best part? This recipe comes together in less than 10 minutes, making it ideal for busy weeknights, last-minute entertaining, or whenever you’re craving something savory and satisfying.
Let’s dive into this incredibly simple recipe.
Why You’ll Love This Pan-Fried Halloumi
There are countless reasons why this recipe deserves a place in your regular meal rotation.
- Only 3 simple ingredients
- Ready in under 10 minutes
- Crispy on the outside and tender inside
- Naturally vegetarian
- High in protein
- Perfect as an appetizer, snack, or side dish
- Easy enough for beginners
- Pairs well with countless meals
Whether you’re preparing brunch, lunch, dinner, or a party platter, pan-fried halloumi always feels elegant while requiring almost no effort.
What Is Halloumi?
Halloumi is a semi-hard cheese traditionally made from sheep’s and goat’s milk, although many modern varieties also include cow’s milk. It originated in Cyprus and has become popular worldwide thanks to its unique texture.
Unlike most cheeses, halloumi has a very high melting point. Instead of melting when heated, it browns beautifully, creating a crispy crust while staying wonderfully chewy inside.
Its mildly salty flavor becomes even more delicious after frying, making it a favorite ingredient for Mediterranean-inspired dishes.
Ingredients
One of the best things about this recipe is its simplicity. You only need three ingredients.
Halloumi Cheese
This is the star of the recipe. Choose a fresh block of halloumi for the best texture and flavor. You’ll find it in the specialty cheese section of most grocery stores.
Olive Oil
A small drizzle of olive oil helps create that beautiful golden crust while adding a subtle richness. You only need enough to lightly coat the bottom of your pan.
Black Pepper or Chili Flakes (Optional)
Freshly cracked black pepper enhances the salty flavor of the cheese, while chili flakes add a gentle kick of heat. Both are optional but highly recommended.
Kitchen Equipment
You’ll only need a few basic kitchen tools.
- Non-stick skillet or cast-iron pan
- Sharp knife
- Cutting board
- Paper towels
- Tongs or spatula
- Serving plate
How to Make Pan-Fried Halloumi
Making halloumi couldn’t be easier. Follow these simple steps for perfectly crispy cheese every time.
Step 1: Prepare the Halloumi
Remove the halloumi from its packaging and gently pat it dry using paper towels.
Drying the cheese helps remove excess moisture, allowing it to brown more effectively instead of steaming in the pan.
Using a sharp knife, slice the halloumi into even pieces about ½ inch (1.25 cm) thick. Keeping the slices uniform ensures they cook evenly and develop the same beautiful golden color.
Avoid slicing them too thin, as they may become overly firm during cooking.
Step 2: Heat the Pan
Place a non-stick skillet or cast-iron pan over medium heat.
Add just enough olive oil to lightly coat the bottom of the pan.
Allow the oil to warm until it begins to shimmer slightly. The pan should be hot enough to create an immediate sizzle when the cheese touches it but not so hot that the oil begins smoking.
Using medium heat is the secret to achieving a crispy crust without burning the exterior.
Step 3: Fry the Halloumi
Carefully arrange the halloumi slices in a single layer.
Avoid overcrowding the pan. If necessary, cook the cheese in batches so every slice has enough space to brown properly.
Once the cheese is in the pan, resist the temptation to move it around.
Leave each slice untouched for 2 to 3 minutes until a deep golden crust develops.
When it’s ready, the cheese will naturally release from the pan with very little sticking.
Step 4: Flip and Cook the Other Side
Using tongs or a spatula, gently flip each slice.
Cook for another 2 minutes until the second side is equally golden and crisp.
The outside should look beautifully caramelized while the inside remains soft and pleasantly chewy.
Once cooked, transfer the halloumi to a serving plate.
Step 5: Season and Serve
Finish with freshly cracked black pepper or a pinch of chili flakes if desired.
Serve immediately while the cheese is still warm. Halloumi tastes best fresh from the pan, when the contrast between the crispy exterior and tender interior is at its peak.
Expert Tips for Perfect Halloumi
Want restaurant-quality results? Keep these tips in mind.
Dry the Cheese First
Removing surface moisture helps achieve better browning and prevents splattering.
Use Medium Heat
High heat can burn the outside before the inside has warmed through.
Don’t Overcrowd the Pan
Giving each slice enough room allows moisture to evaporate and encourages crispness.
Let It Brown Before Flipping
Moving the cheese too soon prevents a proper crust from forming.
Serve Immediately
Halloumi is at its absolute best while hot and freshly cooked.
Delicious Serving Ideas
Pan-fried halloumi is incredibly versatile and pairs well with many different foods.
As an Appetizer
Serve warm with fresh lemon wedges for squeezing over the top.
With Fresh Salads
Add crispy halloumi to Greek salads, arugula salads, or mixed greens for extra protein and flavor.
In Grain Bowls
Layer slices over quinoa, couscous, bulgur, or rice bowls with roasted vegetables.
With Fresh Vegetables
Pair with sliced cucumbers, tomatoes, olives, and herbs for a refreshing Mediterranean-inspired plate.
In Sandwiches
Tuck crispy halloumi into pita bread, wraps, or crusty sandwiches with hummus and fresh vegetables.
Breakfast
Serve alongside avocado toast, scrambled eggs, or roasted tomatoes for a protein-packed breakfast.
With Roasted Vegetables
Halloumi pairs beautifully with zucchini, eggplant, asparagus, peppers, and mushrooms.
Flavor Variations
Although delicious on its own, you can easily customize this recipe.
- Drizzle with hot honey.
- Add smoked paprika.
- Sprinkle with za’atar seasoning.
- Finish with fresh oregano or parsley.
- Add crushed garlic to the olive oil while frying.
- Drizzle with balsamic glaze.
- Top with toasted sesame seeds.
- Add a squeeze of fresh lemon juice.
Each variation gives the cheese a completely different personality while keeping the preparation just as simple.
Storage Tips
Pan-fried halloumi is best enjoyed immediately after cooking.
If you have leftovers, store them in an airtight container in the refrigerator for up to 2 days.
To reheat, warm the slices in a dry skillet over medium heat for a minute or two on each side until heated through.
Avoid microwaving whenever possible, as it can make the cheese rubbery.
Frequently Asked Questions
Can I cook halloumi without oil?
Yes. Halloumi naturally releases a small amount of fat while cooking. However, a little olive oil helps create a more even golden crust and prevents sticking.
Can I grill halloumi instead?
Absolutely. Halloumi is excellent on the grill. Cook it over medium-high heat for about 2–3 minutes per side until grill marks appear.
Is halloumi gluten-free?
Yes. Plain halloumi cheese is naturally gluten-free, but always check the packaging for any added ingredients if you have dietary restrictions.
Why didn’t my halloumi become crispy?
The pan may not have been hot enough, or the cheese may have contained excess moisture. Patting it dry and preheating the pan properly usually solves the problem.
Can I make it ahead of time?
Halloumi is best served immediately after frying. While it can be reheated, the texture is at its finest when freshly cooked.
Final Thoughts
This Easy Pan-Fried Halloumi Recipe proves that incredible flavor doesn’t require a long ingredient list or complicated techniques. With just halloumi cheese, olive oil, and a touch of seasoning, you can create a crispy, golden dish that’s packed with savory goodness in under ten minutes.
Whether you’re serving it as an appetizer, adding it to fresh salads, layering it into sandwiches, or enjoying it alongside roasted vegetables, this versatile cheese is sure to become a staple in your kitchen. Once you experience its irresistible crispy exterior and delightfully chewy center, you’ll find yourself making this simple recipe again and again. Enjoy every warm, golden bite!