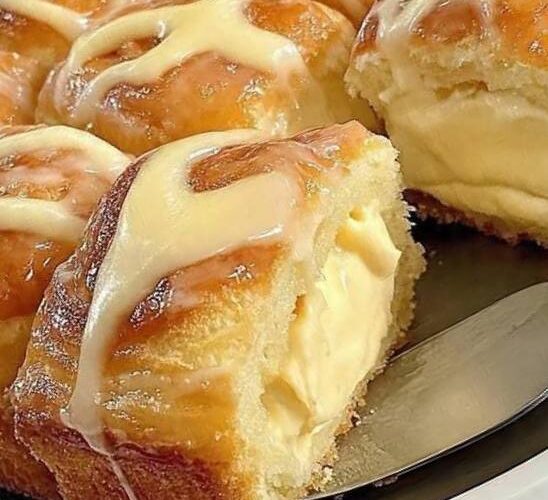
There’s something truly magical about biting into a freshly baked cream-filled bun. The soft, fluffy bread gives way to a rich vanilla cream center that feels light, silky, and irresistibly indulgent. These homemade cream buns are the kind of treat that instantly brings comfort, whether enjoyed with a morning coffee, served as an afternoon snack, or presented as a beautiful dessert for family and friends.
Popular in bakeries around the world, cream-filled buns have earned their reputation as one of the most beloved sweet pastries. Their charm lies in the perfect balance of textures — tender yeast dough paired with a creamy custard filling that melts in your mouth. While bakery versions are delicious, nothing compares to the flavor and freshness of making them at home.
This recipe focuses on creating buns that are incredibly soft and airy while delivering a smooth, thick vanilla cream filling that holds perfectly inside each bun. Every step has been carefully designed to help you achieve bakery-quality results, even if you’re new to working with yeast dough.
The process may seem long at first glance, but don’t worry — each step is simple and rewarding. Once you taste these golden buns topped with sweet glaze and filled with luscious cream, you’ll realize they were worth every minute.
Why You’ll Love These Cream-Filled Buns
These buns are more than just a dessert. They’re the perfect combination of homemade comfort and bakery elegance.
Here’s why this recipe stands out:
- Extra soft and fluffy dough
- Rich and creamy vanilla custard filling
- Light sweetness that isn’t overpowering
- Beautiful bakery-style presentation
- Perfect for breakfast, dessert, or special occasions
- Easy to customize with different flavors
Once you make them, they’ll quickly become one of your favorite homemade pastries.
Nutritional Information
Approximate values per serving:
- Calories: 380
- Protein: 8g
- Carbohydrates: 55g
- Fat: 15g
- Fiber: 2g
- Sodium: 250mg
Ingredients
For the Dough
- 1 cup (240ml) warm milk (105–115°F / 40–46°C)
- 2¼ teaspoons (7g) active dry yeast
- ¼ cup (50g) granulated sugar, plus 1 teaspoon
- 1 large egg, room temperature
- ¼ cup (56g) unsalted butter, melted
- 3½ cups (420g) all-purpose flour
- ½ teaspoon salt
For the Vanilla Cream Filling
- 2 cups (480ml) whole milk
- ½ cup (100g) granulated sugar
- ¼ cup (30g) cornstarch
- 3 large egg yolks
- 2 tablespoons unsalted butter
- 1 teaspoon vanilla extract
- Pinch of salt
For the Glaze
- 1 cup (120g) powdered sugar
- 2–3 tablespoons milk or water
- ½ teaspoon vanilla extract (optional)
Step-by-Step Instructions
Step 1: Activate the Yeast
In a large mixing bowl, combine the warm milk, 1 teaspoon sugar, and yeast. Stir gently and allow the mixture to sit for about 5–10 minutes until it becomes foamy.
This step is important because it confirms your yeast is active and ready to help the dough rise beautifully.
Step 2: Prepare the Dough
Add the remaining sugar, egg, and melted butter to the yeast mixture. Whisk until smooth.
Gradually add the flour and salt, mixing until a shaggy dough forms.
At this stage, the dough may look slightly sticky, which is perfectly normal.
Step 3: Knead the Dough
Transfer the dough onto a lightly floured surface.
Knead for about 8–10 minutes until the dough becomes smooth, elastic, and soft.
If using a stand mixer, knead with a dough hook on medium-low speed for 6–8 minutes.
A properly kneaded dough should spring back lightly when touched.
Step 4: First Rise
Place the dough into a lightly greased bowl and cover with plastic wrap or a kitchen towel.
Allow it to rise in a warm place for 1 to 1½ hours, or until doubled in size.
This proofing stage creates the light, fluffy texture that makes these buns irresistible.
Make the Cream Filling
Step 5: Heat the Milk
In a medium saucepan, heat 1½ cups of milk over medium heat until it begins to simmer gently around the edges.
Do not let it boil.
Step 6: Mix the Custard Base
In another bowl, whisk together:
- Remaining ½ cup milk
- Sugar
- Cornstarch
- Egg yolks
- Salt
Whisk until completely smooth.
Step 7: Temper the Eggs
Slowly pour half of the hot milk into the egg mixture while whisking constantly.
This prevents the eggs from scrambling.
Pour the tempered mixture back into the saucepan.
Step 8: Cook Until Thick
Cook over medium heat while whisking continuously.
The custard will gradually thicken. Once it begins to boil, continue whisking for 1 minute.
This step fully activates the cornstarch and creates a stable filling.
Step 9: Add Butter and Vanilla
Remove the custard from heat.
Stir in the butter and vanilla extract until smooth and glossy.
Transfer the cream to a clean bowl and press plastic wrap directly onto the surface.
Refrigerate for at least 2–3 hours until fully chilled.
Shape and Bake the Buns
Step 10: Divide the Dough
Once the dough has doubled in size, gently punch it down.
Transfer to a lightly floured surface and divide into 12 equal portions.
Roll each piece into a smooth ball.
Step 11: Second Rise
Arrange the dough balls on a parchment-lined baking sheet.
Cover loosely and let rise again for 30–45 minutes until puffy.
This second rise helps create soft, airy buns with a beautiful texture.
Step 12: Bake
Preheat the oven to 375°F (190°C).
Bake for 12–15 minutes until golden brown.
If the tops brown too quickly, loosely cover with foil.
Allow the buns to cool completely on a wire rack.
Fill the Buns
Step 13: Pipe the Cream
Transfer the chilled cream filling into a piping bag.
Using a small knife or chopstick, create a small hole in each bun.
Pipe cream into the center until the buns feel full and heavy.
This is where the magic happens.
Each bun transforms into a bakery-style masterpiece filled with silky vanilla cream.
Prepare the Glaze
Step 14: Make the Sweet Glaze
Whisk together powdered sugar, milk, and vanilla until smooth.
Adjust consistency if needed by adding more milk a teaspoon at a time.
Drizzle the glaze over the buns and let it set before serving.
Tips for Perfect Cream-Filled Buns
Use Proper Milk Temperature
The milk should feel warm, not hot.
If it’s too hot, it can kill the yeast. Too cold, and the yeast won’t activate properly.
Don’t Skip Kneading
Kneading develops gluten, which gives the buns their soft and stretchy texture.
The dough should become smooth and elastic before proofing.
Chill the Cream Completely
Warm cream filling will melt inside the buns and create a mess.
Always refrigerate until thick and cold.
Cool the Buns Before Filling
Filling warm buns can cause the cream to become runny.
Patience here makes a huge difference.
Delicious Flavor Variations
Chocolate Cream Buns
Add melted dark chocolate to the warm custard for a rich chocolate filling.
Lemon Cream Buns
Mix lemon zest and fresh lemon juice into the cream for a bright citrus flavor.
Berry Cream Buns
Fold fresh raspberries or strawberries into the chilled cream before filling.
Coffee Glaze
Replace part of the glaze liquid with strong coffee for a delicious mocha-style topping.
Cinnamon Sugar Version
Skip the glaze and coat warm buns in cinnamon sugar after brushing with butter.
Storage Instructions
Because these buns contain cream filling, they should always be refrigerated.
Store in an airtight container for up to 3 days.
The buns are softest and freshest on the day they’re made, but they still taste wonderful chilled.
Can You Freeze Them?
Yes — but freeze the buns before filling.
Once baked and cooled, place unfilled buns in a freezer-safe bag and freeze for up to 1 month.
Thaw at room temperature before filling and glazing.
Freezing filled buns is not recommended because the cream texture may change after thawing.
Frequently Asked Questions
Why didn’t my dough rise?
Usually this happens because the yeast was inactive or the milk was too hot.
Always test the yeast first by waiting for a foamy mixture.
Can I make the dough overnight?
Absolutely.
After the first rise, refrigerate the dough overnight and continue the next day.
This can actually improve flavor.
Why is my cream filling lumpy?
The custard likely wasn’t whisked constantly while cooking.
If needed, strain the warm filling through a fine mesh sieve for a silky texture.
Can I use instant yeast?
Yes.
You can substitute instant yeast in the same quantity and skip the activation step.
Final Thoughts
Homemade cream-filled buns are one of those classic recipes that never fail to impress. From the fluffy golden bread to the silky vanilla filling, every bite feels comforting, rich, and satisfying.
Whether you’re baking for a holiday gathering, a family dessert, or simply treating yourself on a cozy weekend, these buns are guaranteed to disappear quickly. Once you experience the taste of freshly baked cream buns made from scratch, bakery versions simply won’t compare.
Soft, creamy, sweet, and beautifully homemade — this recipe is pure joy in pastry form.