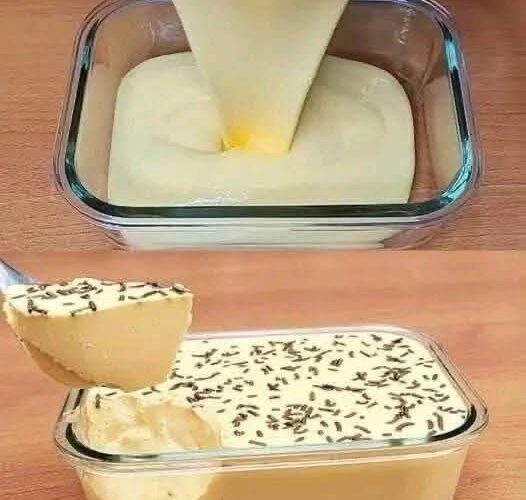
A Creamy, Silky Dessert Ready in Minutes
There are moments when the craving for something sweet arrives without warning. Not the kind that invites a long baking session or a sink full of dishes—but something simple, comforting, and quick. That’s exactly where this 2-ingredient milk pudding shines.
Made with nothing more than milk and cornstarch, this dessert is proof that simplicity can be incredibly satisfying. With a smooth, silky texture and a delicate flavor, it’s the kind of treat that feels both nostalgic and elegant. Even better, it requires no eggs, no oven, and no complicated techniques—just a few minutes on the stove and some patience while it chills.
Whether you enjoy it plain or dress it up with chocolate, fruit, or spices, this pudding is a versatile recipe you’ll come back to again and again. Once you master it, you’ll not only have a reliable dessert but also a foundational kitchen skill that opens the door to endless variations.
Why You’ll Love This Recipe
This milk pudding is more than just easy—it’s incredibly practical and adaptable.
- Only 2 base ingredients
- No baking required
- Ready in minutes
- Beginner-friendly
- Smooth, creamy texture
- Easy to customize
- Budget-friendly
- Perfect for making ahead
It’s not just a recipe—it’s a technique you can build on for countless desserts.
The Two Key Ingredients
Milk (2 cups)
Milk forms the creamy base of this pudding. Whole milk gives the richest and smoothest result, while 2% milk works well for a slightly lighter version. Skim milk can be used, but it produces a thinner, less luxurious texture.
You can also use plant-based alternatives like almond, oat, or coconut milk. Full-fat coconut milk, in particular, creates a rich and slightly tropical variation.
Cornstarch (2 tablespoons)
Cornstarch is the thickening agent that transforms liquid milk into a pudding. When heated, it absorbs liquid, swells, and creates a smooth gel-like consistency.
Compared to flour, cornstarch produces a clearer, silkier texture and thickens more efficiently.
Optional Flavor Additions
While the base recipe works on its own, adding a few simple ingredients enhances both flavor and sweetness:
- Sugar (3–4 tablespoons) for sweetness
- Vanilla extract (1 teaspoon) for depth
- Cocoa powder (2 tablespoons) for chocolate flavor
- Honey or maple syrup for natural sweetness
- Cinnamon for warmth
These additions turn a simple pudding into a true dessert experience.
The Basic Recipe
Prep Time: 2 minutes
Cook Time: 5–8 minutes
Chill Time: 1–2 hours
Servings: 2–4
Ingredients
- 2 cups milk (room temperature)
- 2 tablespoons cornstarch
- 3–4 tablespoons sugar (optional)
- 1 teaspoon vanilla extract (optional)
Equipment
- Medium saucepan
- Whisk
- Measuring cups and spoons
- Serving bowls or ramekins
- Plastic wrap
Step-by-Step Instructions
Step 1: Make a Slurry
In a small bowl, whisk the cornstarch with about ¼ cup of cold milk until completely smooth. This step is essential to prevent lumps.
Step 2: Heat the Milk
Pour the remaining milk into a saucepan. Add sugar if using, and heat over medium heat until hot and steaming—but not boiling.
Step 3: Add the Slurry
Stir the cornstarch mixture again, then slowly pour it into the hot milk while whisking continuously.
Step 4: Cook Until Thickened
Continue whisking for 2–3 minutes. The mixture will thicken into a pudding consistency. Once it coats the back of a spoon, remove it from the heat.
Step 5: Add Flavor
Stir in vanilla extract or any flavoring you prefer.
Step 6: Portion
Pour the pudding into serving bowls or ramekins.
Step 7: Prevent Skin Formation
Press plastic wrap directly onto the surface of the pudding to prevent a skin from forming.
Step 8: Chill
Refrigerate for 1–2 hours until fully set.
Step 9: Serve
Remove plastic wrap, add toppings, and enjoy cold.
Pro Tips for Perfect Pudding
- Always mix cornstarch with cold liquid first
- Whisk constantly to avoid lumps
- Don’t overcook, or the pudding may thin out
- Use plastic wrap directly on the surface
- Strain if needed for extra smoothness
- Adjust sweetness before chilling
Delicious Variations
Once you’ve mastered the base, try these easy upgrades:
Chocolate Pudding
Add cocoa powder before heating the milk.
Coconut Pudding
Replace half the milk with coconut milk.
Strawberry Pudding
Blend strawberries and substitute part of the milk.
Coffee Pudding
Add instant coffee to the warm milk.
Honey Vanilla
Use honey instead of sugar and add vanilla.
Matcha Pudding
Whisk matcha into the slurry.
Pumpkin Spice
Add pumpkin purée and warm spices.
Banana Pudding
Stir in mashed banana after cooking.
Serving Ideas
Take your pudding to the next level with toppings:
- Chocolate sprinkles
- Fresh berries
- Crushed cookies
- Toasted coconut
- Chopped nuts
- Caramel sauce
- Whipped cream
You can even layer it with cookies and cream to create a quick dessert parfait.
Storage and Make-Ahead Tips
Refrigerator
Store covered for up to 4 days. Keep plastic wrap on the surface.
Freezer
Not recommended, as texture may become grainy.
Make Ahead
Perfect for preparing 1–2 days in advance.
Nutrition (Per Serving)
Approximate values with sugar:
- Calories: 210
- Protein: 5g
- Fat: 5g
- Carbohydrates: 36g
- Sugar: 28g
Without sugar, calories drop significantly, making this a lighter dessert option.
Frequently Asked Questions
Why is my pudding lumpy?
The cornstarch wasn’t fully dissolved or was added incorrectly.
Why didn’t it thicken?
It may need more cooking time or more cornstarch.
Can I make it vegan?
Yes, use plant-based milk and a natural sweetener.
Can it be sliced?
Increase cornstarch slightly for a firmer texture.
Why is there liquid on top?
This happens when overcooked—just stir it back in.
The Science Behind It
Cornstarch thickens through a process called gelatinization. As it heats, the starch absorbs liquid and forms a network that traps moisture, creating a smooth gel. This is why the pudding thickens quickly and firms up even more as it cools.
Understanding this helps you control texture and avoid common mistakes.
Final Thoughts
This 2-ingredient milk pudding is a reminder that great desserts don’t need to be complicated. With just a few simple steps, you can create something creamy, comforting, and endlessly customizable.
It’s the kind of recipe you’ll rely on when time is short, ingredients are limited, or you simply want something sweet without the effort. Whether you keep it plain or experiment with flavors, it’s a dessert that always delivers.
Once you try it, you’ll wonder how something so simple can taste so good—and you’ll likely find yourself making it again and again.