The Ultimate Sweet and Salty Dessert You’ll Make Again and Again
If you’re searching for a dessert that’s equal parts sweet, salty, buttery, crunchy, and irresistibly chocolatey, these Salted Caramel Chocolate Pretzel Bars deserve a spot at the top of your baking list. Made with only four simple ingredients, this easy recipe transforms everyday pantry staples into a decadent dessert that’s perfect for parties, holidays, potlucks, bake sales, or simply satisfying your sweet tooth.
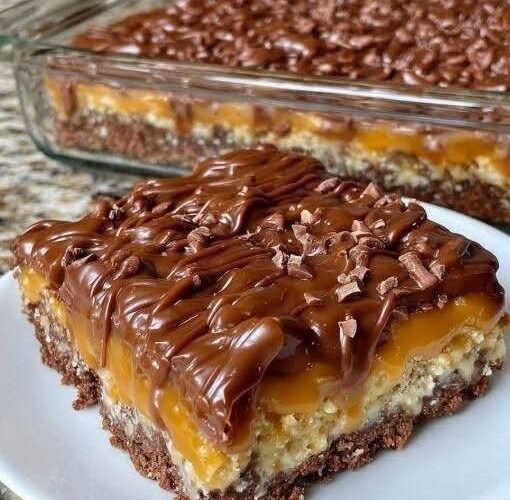
Every bite begins with a crisp, buttery pretzel crust that offers the perfect salty crunch. Next comes a layer of rich, chewy caramel that bakes into the crust, creating an irresistible gooey center. Finally, everything is topped with silky melted semi-sweet chocolate that hardens into a smooth, glossy finish. The contrast of textures and flavors makes these dessert bars incredibly addictive.
One of the best things about this recipe is its simplicity. There are no complicated techniques, no fancy equipment, and only four ingredients required. Whether you’re an experienced baker or trying your hand at homemade desserts for the first time, these bars come together effortlessly.
Once chilled and sliced, they become the perfect handheld treat that looks just as impressive as it tastes. Trust us—don’t expect leftovers!
Why You’ll Love These Salted Caramel Chocolate Pretzel Bars
There are countless dessert recipes out there, but this one stands out for several reasons:
- Made with only 4 simple ingredients.
- Sweet and salty flavors in every bite.
- Crunchy pretzel crust with a buttery texture.
- Gooey baked caramel center.
- Smooth chocolate topping.
- Perfect make-ahead dessert.
- Great for holidays, birthdays, bake sales, and family gatherings.
- Easy enough for beginner bakers.
- Stores beautifully in the refrigerator.
Whether you love chocolate, caramel, or salty snacks, these bars combine all three into one unforgettable dessert.
Ingredients
You’ll only need four pantry-friendly ingredients.
3 cups salted pretzels, crushed
Salted pretzels create the perfect crunchy base. Their salty flavor balances the sweetness of the caramel and chocolate beautifully. Crush them into coarse crumbs, leaving a few larger pieces for added texture.
1 cup unsalted butter, melted
Butter binds the crust together while adding incredible richness. Unsalted butter allows the pretzels’ natural saltiness to shine without becoming overpowering.
1¼ cups thick caramel sauce
Use your favorite store-bought caramel sauce or homemade caramel. A thicker caramel works best because it stays beautifully layered during baking.
1 cup semi-sweet chocolate chips
Semi-sweet chocolate offers the ideal balance of sweetness and richness. As the chips melt from the heat of the caramel, they spread into a smooth, glossy topping.
Kitchen Equipment You’ll Need
- 9×13-inch glass baking dish
- Mixing bowl
- Measuring cups
- Rolling pin or heavy pan
- Large zip-top bag
- Rubber spatula
- Offset spatula or spoon
- Measuring cup (for pressing the crust)
How to Make Salted Caramel Chocolate Pretzel Bars
Step 1: Prepare the Baking Dish
Preheat your oven to 350°F (175°C).
Lightly grease a 9×13-inch glass baking dish with butter, making sure to coat the bottom and corners well. This will help the finished bars release cleanly after chilling.
Step 2: Crush the Pretzels
Place the salted pretzels inside a large zip-top bag.
Using a rolling pin or the bottom of a heavy saucepan, gently crush the pretzels until they resemble coarse crumbs. Avoid turning them into powder—you want small crunchy pieces throughout the crust.
Step 3: Make the Pretzel Crust
Transfer the crushed pretzels into a medium mixing bowl.
Pour the melted butter over the pretzels and stir until every crumb is evenly coated. The mixture should appear slightly glossy and hold together when pressed.
Step 4: Press the Crust
Pour the buttered pretzel mixture into your prepared baking dish.
Using clean hands or the flat bottom of a measuring cup, press the mixture firmly into an even layer across the bottom of the pan. Pressing firmly helps create a sturdy crust that won’t crumble when sliced.
Step 5: Bake the Crust
Bake the pretzel crust for 8–10 minutes.
The crust should become lightly golden and fragrant while beginning to set.
Remove it from the oven but leave the oven turned on.
Step 6: Add the Caramel
While the crust is still warm, slowly pour the caramel sauce evenly over the surface.
Use the back of a spoon or an offset spatula to gently spread the caramel into the corners without disturbing the crust underneath.
Step 7: Bake Again
Return the pan to the oven.
Bake for another 10–12 minutes, until the caramel bubbles gently around the edges and thickens slightly.
This second bake helps the caramel bond with the crust while developing an even richer flavor.
Step 8: Melt the Chocolate
Remove the baking dish from the oven.
Immediately sprinkle the chocolate chips evenly over the hot caramel.
Allow them to sit untouched for 3–5 minutes. The residual heat will soften the chocolate until it’s perfectly spreadable.
Step 9: Spread the Chocolate
Using a small offset spatula or the back of a spoon, gently spread the melted chocolate into an even layer.
You can leave it perfectly smooth or create decorative swirls for a homemade finish.
Step 10: Chill Until Firm
Allow the bars to cool completely at room temperature.
Once the pan is no longer warm, transfer it to the refrigerator and chill for at least 2 hours, or until fully set.
Proper chilling ensures clean slices and distinct layers.
Step 11: Slice and Serve
Before cutting, let the chilled pan rest at room temperature for 10–15 minutes.
Run a thin knife around the edges before slicing into 16 squares.
Serve chilled or at cool room temperature.
Tips for Perfect Pretzel Bars
- Don’t over-crush the pretzels. Small chunks create the best texture.
- Press the crust firmly to prevent crumbling.
- Use thick caramel sauce for clean layers.
- Let the chocolate melt naturally before spreading.
- Chill thoroughly before slicing.
- Use a sharp knife for neat squares.
- Wipe the knife clean between cuts for bakery-style presentation.
Variations
This recipe is delicious as written, but it’s also easy to customize.
Sea Salt Finish
Sprinkle flaky sea salt over the melted chocolate before chilling for an extra burst of sweet-and-salty flavor.
Peanut Butter Version
Drizzle melted peanut butter over the chocolate layer before chilling.
Dark Chocolate
Replace the semi-sweet chocolate chips with dark chocolate for a richer dessert.
Holiday Version
Decorate the chocolate with festive sprinkles before it sets.
Nutty Crunch
Top with chopped pecans, almonds, or peanuts for added texture.
Storage
Store the bars in an airtight container in the refrigerator for up to 1 week.
Separate layers with parchment paper to prevent sticking.
These bars can also be frozen for up to 2 months. Thaw overnight in the refrigerator before serving.
Frequently Asked Questions
Can I use homemade caramel?
Absolutely. Homemade caramel works wonderfully as long as it’s thick enough to spread easily.
Can I use milk chocolate?
Yes. Milk chocolate creates a sweeter dessert, while semi-sweet chocolate provides better balance against the caramel.
Why should I let the bars sit before cutting?
Allowing the chilled bars to rest at room temperature for 10–15 minutes softens the chocolate slightly. This helps prevent the chocolate layer from cracking or shattering as you slice.
Can I make these ahead of time?
Definitely. These bars are an excellent make-ahead dessert and actually taste even better after chilling overnight.
Can I use unsalted pretzels?
Yes, but salted pretzels provide the signature sweet-and-salty contrast that makes this dessert so special.
Final Thoughts
These Salted Caramel Chocolate Pretzel Bars are proof that you don’t need a long list of ingredients to create an unforgettable dessert. With their buttery pretzel crust, rich caramel filling, and smooth chocolate topping, they strike the perfect balance between sweet and salty while delivering an irresistible combination of crunchy and chewy textures.
Whether you’re baking for a holiday gathering, preparing treats for friends, or simply indulging your own dessert cravings, this easy recipe is guaranteed to become a favorite. Best of all, it’s simple enough to make any day of the week, yet impressive enough to serve on special occasions.
Once you make these bars, don’t be surprised if everyone asks for the recipe. One bite is all it takes to understand why this four-ingredient dessert has become a go-to favorite for chocolate and caramel lovers alike.