Introduction
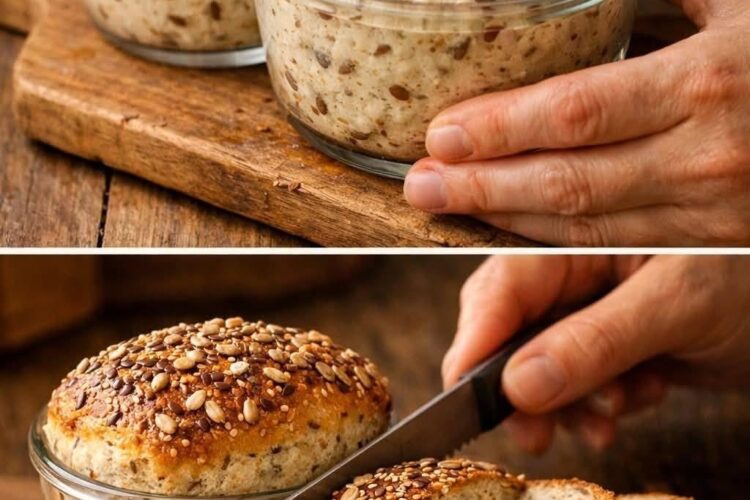
There’s something deeply comforting about homemade bread—the warm aroma filling your kitchen, the anticipation as it bakes, and the satisfying moment of slicing into a golden crust. The image above captures a beautifully simple yet ingenious approach to bread-making: a soft, seed-studded dough prepared and baked directly in a glass jar, resulting in a perfectly shaped, rustic loaf.
This recipe is ideal for beginners and busy home cooks alike. It requires minimal effort, no kneading, and uses simple pantry ingredients. The addition of mixed seeds not only enhances the texture but also brings a nutty, wholesome flavor that makes every bite satisfying. Whether you enjoy it fresh out of the oven, toasted with butter, or paired with your favorite spreads, this bread is bound to become a staple in your kitchen.
Why You’ll Love This Recipe
This bread recipe stands out for several reasons:
- No kneading required – perfect if you’re new to baking
- Minimal equipment – just a bowl and oven-safe jars
- Nutritious – packed with seeds for added fiber and flavor
- Beautiful presentation – baked directly in jars for a rustic look
- Versatile – works for breakfast, snacks, or side dishes
Ingredients
Here’s what you’ll need to recreate this delicious bread:
Dry Ingredients
- 3 cups all-purpose flour
- 1 teaspoon salt
- 1 tablespoon sugar or honey
- 2 teaspoons instant yeast
Wet Ingredients
- 1 ½ cups warm water (not hot)
Seeds Mix (Customize as You Like)
- 2 tablespoons sunflower seeds
- 2 tablespoons sesame seeds
- 1 tablespoon flaxseeds
- 1 tablespoon chia seeds (optional)
For Topping
- Extra seeds for sprinkling
- 1 tablespoon milk or water (for brushing)
Equipment
- Mixing bowl
- Wooden spoon or spatula
- Oven-safe glass jars or small baking dishes
- Clean kitchen towel
Step-by-Step Instructions
Step 1: Prepare the Dough
In a large mixing bowl, combine the flour, salt, sugar, and yeast. Mix well to evenly distribute the dry ingredients.
Gradually pour in the warm water while stirring with a wooden spoon. The dough will be sticky and soft—that’s exactly what you want. There’s no need to knead it.
Step 2: Add the Seeds
Fold in your seed mixture gently. The seeds will be evenly distributed throughout the dough, adding texture and flavor to every bite.
Step 3: First Rise
Cover the bowl with a clean kitchen towel and let the dough rest in a warm place for about 1 to 1.5 hours, or until it doubles in size.
During this time, the yeast will activate, creating air pockets that give the bread its soft and fluffy interior.
Step 4: Prepare the Jars
Lightly grease your oven-safe glass jars or baking dishes with a bit of oil or butter. This prevents sticking and helps create a nice crust.
Step 5: Shape the Dough
Once the dough has risen, gently stir it down to release excess air. Spoon the dough into the prepared jars, filling them about halfway.
Don’t overfill—the dough will rise again during baking.
Step 6: Second Rise
Cover the jars loosely and let the dough rest for another 20–30 minutes. This second rise ensures a lighter texture.
Step 7: Add Toppings
Brush the tops lightly with milk or water, then sprinkle extra seeds on top. This gives the bread its beautiful, textured crust.
Step 8: Bake
Preheat your oven to 180°C (350°F).
Place the jars in the oven and bake for 30–40 minutes, or until the tops are golden brown and the bread sounds hollow when tapped.
Step 9: Cool and Serve
Remove the jars from the oven and let them cool slightly. Carefully take the bread out (if desired) and slice.
Enjoy warm or at room temperature.
Texture and Flavor
This bread has a soft, airy crumb with a slightly chewy texture thanks to the seeds. The crust is golden and lightly crisp, with a nutty aroma that makes it irresistible.
Each slice offers a balance of softness and crunch, making it perfect for both sweet and savory toppings.
Serving Ideas
This seeded bread is incredibly versatile. Here are some delicious ways to enjoy it:
- Spread with butter and honey for a simple breakfast
- Toasted with avocado and a pinch of salt
- Served לצד soups or salads
- Used for sandwiches
- Paired with cheese and olives for a snack platter
Tips for Success
- Use warm, not hot water – hot water can kill the yeast
- Don’t overmix – a sticky dough is normal
- Let it rise fully – patience is key for fluffy bread
- Grease jars היטב – ensures easy removal
- Experiment with seeds – pumpkin seeds, oats, or even nuts work great
Variations
Want to switch things up? Try these ideas:
Herb Bread
Add dried herbs like oregano, thyme, or rosemary for a savory twist.
Cheesy Version
Mix in grated cheese for a richer flavor.
Whole Wheat Option
Replace half of the flour with whole wheat flour for a denser, more nutritious loaf.
Sweet Version
Add a handful of raisins and a bit of cinnamon for a breakfast-style bread.
Storage
- Store at room temperature in an airtight container for up to 2 days
- Refrigerate for up to 5 days
- Freeze slices for up to 1 month
To reheat, simply toast or warm in the oven for a few minutes.
Nutritional Benefits
Thanks to the seeds, this bread offers:
- Healthy fats
- Fiber for digestion
- Plant-based protein
- Essential minerals مثل magnesium and الحديد
It’s a wholesome alternative to store-bought bread, with no unnecessary additives.
Why Bake Bread in a Jar?
Baking bread in jars isn’t just visually appealing—it also has practical benefits:
- Helps maintain shape
- Creates a moist interior
- Ideal for portion control
- Perfect for gifting
Plus, it adds a charming, rustic touch to your kitchen creations.
Final Thoughts
This seeded no-knead bread in a jar is proof that baking doesn’t have to be complicated to be rewarding. With just a few ingredients and minimal effort, you can create a loaf that’s both beautiful and delicious.
Whether you’re baking for yourself, your family, or guests, this recipe delivers comfort, flavor, and satisfaction in every slice.
So next time you’re craving fresh bread, skip the store and try this simple homemade version—you might never go back.