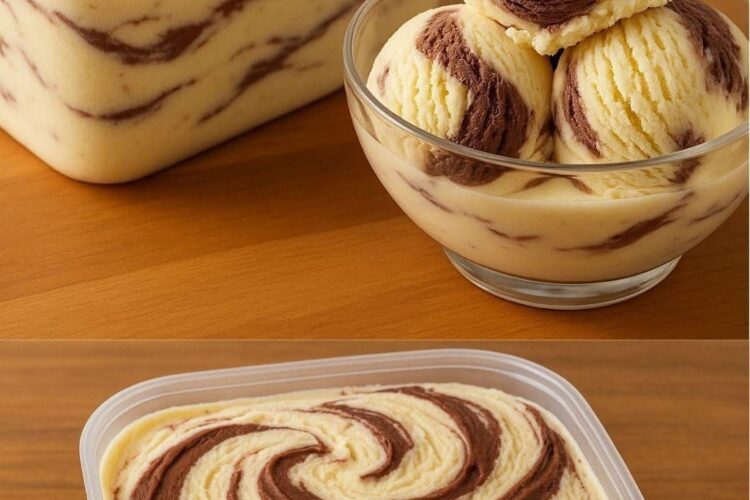
There’s something truly magical about homemade ice cream. It’s rich, creamy, comforting, and made with love, transforming a handful of simple ingredients into a frozen dessert that tastes like it came from a premium ice cream shop. While traditional ice cream recipes often require expensive machines and constant churning, this no-churn vanilla chocolate swirl ice cream proves that incredible homemade desserts can be wonderfully simple.
Imagine scooping into silky vanilla ice cream laced with ribbons of rich, melted chocolate. Every bite delivers a perfect balance of sweet vanilla and decadent cocoa, creating a dessert that’s both elegant and irresistible. The creamy texture melts effortlessly on your tongue, making it hard to believe it came from your own freezer.
The secret behind this recipe is the classic no-churn method. Instead of relying on an ice cream maker, whipped heavy cream creates an airy texture while sweetened condensed milk provides sweetness and keeps the finished ice cream incredibly smooth. The result is a luxurious dessert with virtually no effort.
Whether you’re hosting a summer barbecue, celebrating a birthday, or simply craving something sweet after dinner, this recipe never disappoints. Better yet, it’s completely customizable. Once you’ve mastered the basic vanilla and chocolate swirl, you can experiment with endless flavors, mix-ins, and toppings.
If you’ve never made homemade ice cream before, this is the perfect recipe to start with.
Why You’ll Love This Recipe
There are countless reasons to keep this recipe on repeat throughout the year.
- No ice cream maker required
- Only five simple ingredients
- Rich, creamy texture
- Beautiful chocolate swirls
- Perfect for beginners
- Easy to customize
- Freezes beautifully
- Ready with just 15 minutes of active preparation
This recipe tastes remarkably similar to premium store-bought ice cream but costs far less to make.
Ingredients
- 2 cups (480ml) very cold heavy whipping cream
- 1 (14-ounce/397g) can sweetened condensed milk, chilled
- 1 teaspoon pure vanilla extract
- 4 ounces good-quality semi-sweet or dark chocolate, finely chopped
- 2 tablespoons heavy cream (for the chocolate swirl)
Kitchen Equipment
You’ll need just a few basic tools:
- Large mixing bowl
- Electric hand mixer or stand mixer
- Rubber spatula
- Microwave-safe bowl
- Butter knife or skewer
- Freezer-safe loaf pan or airtight container
- Plastic wrap or airtight lid
Step-by-Step Instructions
Step 1: Chill Everything
Cold ingredients are the secret to perfect whipped cream.
Place your mixing bowl and beaters in the freezer for about 20 minutes. Keep both the heavy cream and sweetened condensed milk refrigerated until you’re ready to use them.
Starting with cold ingredients creates a lighter, fluffier ice cream base.
Step 2: Whip the Cream
Pour the cold heavy cream into the chilled mixing bowl.
Using an electric mixer, beat on medium speed before increasing to high speed.
Continue mixing until stiff peaks form.
When you lift the beaters, the whipped cream should stand upright without collapsing.
Avoid whipping too long, or the cream may become grainy and eventually turn into butter.
Step 3: Make the Vanilla Base
Pour the chilled sweetened condensed milk into the whipped cream.
Add the vanilla extract.
Using a rubber spatula, gently fold everything together until completely combined.
Take your time.
The goal is to preserve as much air as possible inside the whipped cream since those tiny air bubbles create the smooth, creamy consistency that makes this recipe so special.
Step 4: Prepare the Chocolate Swirl
Place the chopped chocolate and two tablespoons of heavy cream into a microwave-safe bowl.
Microwave in 20-second intervals, stirring after each interval until completely melted and smooth.
Alternatively, melt the chocolate over a double boiler.
Allow the chocolate mixture to cool for several minutes.
It should remain pourable but no longer feel hot.
Step 5: Layer the Ice Cream
Spread one-third of the vanilla ice cream mixture into your freezer container.
Drizzle one-third of the melted chocolate over the top.
Repeat the layers two more times until you’ve used all the vanilla mixture and chocolate.
Step 6: Create Beautiful Swirls
Using a butter knife, gently swirl through the layers.
Move the knife in slow S-shaped motions.
Don’t overmix.
The goal is to create elegant ribbons of chocolate rather than blending everything together.
Each scoop should reveal stunning marbled patterns.
Step 7: Freeze
Cover the container tightly with plastic wrap or an airtight lid.
Freeze for at least 6–8 hours.
For the best texture, freeze overnight.
Step 8: Serve
Remove the ice cream from the freezer about 5–10 minutes before serving.
This slight softening makes scooping much easier while allowing the flavors to shine.
Serve in bowls, waffle cones, or alongside your favorite desserts.
Nutrition Information
Approximate per serving (8 servings)
- Calories: 420
- Protein: 5g
- Carbohydrates: 38g
- Fat: 29g
- Fiber: 1g
- Sodium: 80mg
Tips for Perfect No-Churn Ice Cream
Always Use Cold Ingredients
Cold cream whips much faster and creates a stable structure that freezes beautifully.
Use Quality Chocolate
Premium chocolate makes a noticeable difference.
Choose a chocolate bar instead of chocolate chips for smoother melting and richer flavor.
Fold Gently
Avoid stirring vigorously.
Gentle folding keeps the whipped cream fluffy and prevents the mixture from becoming dense.
Cool the Chocolate
Never pour hot chocolate directly into the whipped cream.
Warm chocolate can melt the cream and ruin the airy texture.
Don’t Overswirl
A few passes with the knife are enough.
Too much swirling turns the chocolate into muddy streaks instead of beautiful ribbons.
Freeze Properly
Cover the surface tightly to prevent freezer burn and unwanted ice crystals.
Flavor Variations
One of the best things about homemade ice cream is how easy it is to personalize.
Mint Chocolate Swirl
Add ½ teaspoon peppermint extract to the vanilla mixture for a refreshing twist.
Mocha Ice Cream
Mix 1 tablespoon instant espresso powder with a tablespoon of hot water.
Cool completely before folding into the vanilla base.
Salted Caramel Swirl
Replace the chocolate with thick caramel sauce and sprinkle flaky sea salt between the layers.
Peanut Butter Chocolate
Warm creamy peanut butter until pourable and swirl alongside the chocolate.
It’s reminiscent of your favorite peanut butter cup.
Cookies and Cream
Fold crushed chocolate sandwich cookies into the vanilla mixture before freezing.
Berry Swirl
Cook fresh strawberries, raspberries, or blueberries with a little sugar until thick.
Cool completely before swirling into the ice cream.
Cookie Dough
Add small pieces of edible egg-free cookie dough between the layers.
Every scoop becomes a surprise.
Rocky Road
Mix in mini marshmallows, toasted almonds, and extra chocolate chunks.
Serving Ideas
This creamy dessert pairs wonderfully with:
- Fresh strawberries
- Brownies
- Warm chocolate cake
- Apple pie
- Chocolate chip cookies
- Waffle cones
- Homemade whipped cream
- Chocolate syrup
- Toasted nuts
- Fresh mint
It also makes an impressive ice cream sundae bar for parties.
Storage Tips
Store your ice cream in an airtight freezer-safe container.
For even better protection, press plastic wrap directly against the surface before sealing with the lid.
Keep the container toward the back of the freezer where temperatures remain most consistent.
Properly stored, this ice cream stays delicious for up to three weeks.
Although it’s safe beyond that, the texture gradually becomes less creamy as ice crystals develop.
How to Scoop Like a Pro
Homemade ice cream freezes quite firmly.
Let it rest on the counter for 5 to 10 minutes before scooping.
For extra-smooth scoops, dip your ice cream scoop into hot water between servings.
The warm scoop glides effortlessly through the frozen dessert.
Frequently Asked Questions
Why is my homemade ice cream icy?
Ice crystals usually form because the container wasn’t airtight or the ingredients weren’t cold enough before mixing.
Using chilled ingredients and sealing the container properly helps create a smoother texture.
Can I make this without an electric mixer?
Yes.
You can whisk the heavy cream by hand, although it takes around 10 to 15 minutes and requires some patience.
A chilled bowl and whisk make the process much easier.
Can I use milk chocolate?
You can, but semi-sweet or dark chocolate provides a richer contrast to the sweet vanilla base.
Milk chocolate tends to produce a sweeter overall dessert.
How long does homemade ice cream last?
For the best flavor and texture, enjoy it within two to three weeks.
Keep it tightly covered to minimize freezer burn.
Can I add mix-ins?
Absolutely.
Mini chocolate chips, crushed cookies, chopped nuts, coconut, candy pieces, caramel bits, or fresh fruit all make wonderful additions.
Fold them in gently just before freezing.
Final Thoughts
Homemade no-churn vanilla chocolate swirl ice cream is proof that extraordinary desserts don’t require complicated techniques or expensive equipment. With just five simple ingredients and a little patience while it freezes, you’ll create an incredibly creamy frozen treat that’s every bit as satisfying as your favorite premium ice cream.
The combination of fluffy whipped cream, sweet vanilla, and ribbons of rich chocolate creates a dessert that’s timeless, elegant, and endlessly customizable. Whether you stick with the classic version or experiment with caramel, coffee, berries, or cookie dough, this recipe is one you’ll return to again and again.
So grab your mixing bowl, whip up a batch, and make room in your freezer. Once you’ve tasted this homemade masterpiece, you’ll discover just how easy it is to create ice cream that’s rich, creamy, and absolutely unforgettable.