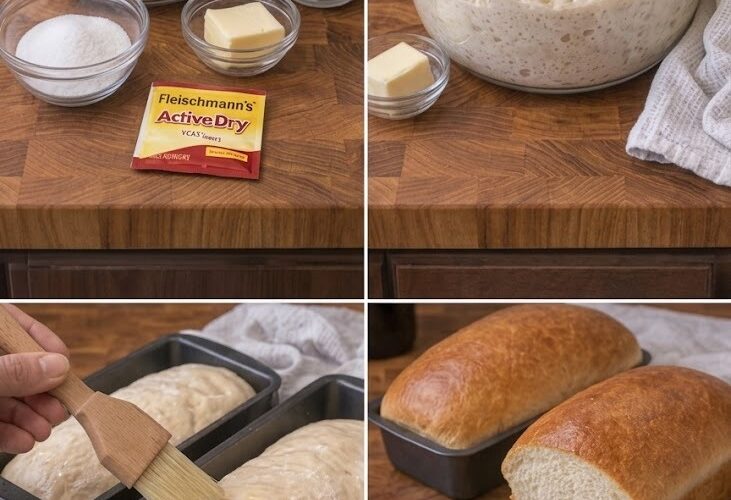
There’s something deeply comforting about the smell of freshly baked bread filling your home. It’s warm, nostalgic, and almost magical. If you’ve ever thought that baking bread from scratch is complicated or time-consuming, this recipe is here to prove otherwise. Simple, reliable, and incredibly satisfying, this foolproof homemade bread will make you rethink ever buying store-bought loaves again.
Imagine slicing into a soft, golden loaf straight out of your oven, spreading a generous layer of butter that melts instantly into its warm, fluffy interior. The texture is light yet hearty, the crust perfectly tender, and the flavor far superior to anything you’ll find at a bakery. Once you try it, this recipe will become a staple in your kitchen.
Why You’ll Love This Recipe
This homemade bread recipe is designed for everyone, from beginners to experienced bakers. It uses simple pantry ingredients and straightforward steps, making it approachable and stress-free.
The dough comes together easily, rises beautifully, and bakes into a soft, pillowy loaf with a delicate crust. It’s perfect for sandwiches, toast, or simply enjoying warm with butter. Plus, there’s something incredibly rewarding about creating your own bread from scratch—it connects you to a timeless culinary tradition.
Ingredients
To make this delicious homemade bread, you’ll need:
- 1 cup warm milk
- ½ cup warm water
- 2¼ teaspoons active dry yeast
- ¼ cup sugar
- 2 tablespoons butter, melted
- 1 teaspoon salt
- 4 to 4½ cups all-purpose flour
Each ingredient plays an important role. The yeast helps the bread rise and become fluffy, while the sugar feeds the yeast and adds a subtle sweetness. The butter enriches the dough, giving it a soft texture and rich flavor. Flour forms the structure, and the salt enhances all the flavors.
Understanding the Basics
Before you begin, it helps to understand a few key principles of bread making. Yeast is a living organism that thrives in warm environments. When combined with warm liquid and sugar, it activates and produces gas, which causes the dough to rise.
Temperature is crucial. The milk and water should be warm but not hot—around 37–43°C (98–110°F). Too hot, and you risk killing the yeast. Too cold, and it won’t activate properly.
Kneading is another essential step. It develops gluten, the protein that gives bread its structure and chewiness. Proper kneading results in a smooth, elastic dough that rises well and bakes into a soft loaf.
Step-by-Step Instructions
Step 1: Activate the Yeast
In a large mixing bowl, combine the warm milk and warm water. Add the sugar and stir until dissolved. Sprinkle the yeast over the top and let it sit for about 5 to 10 minutes.
You’ll know the yeast is ready when it becomes foamy and bubbly. This step ensures your yeast is active and will give your bread a good rise.
Step 2: Mix the Dough
Add the melted butter and salt to the yeast mixture. Gradually begin adding the flour, one cup at a time, mixing well after each addition.
At first, the dough will be sticky and soft. As you add more flour, it will start to come together into a manageable dough. Be careful not to add too much flour—your dough should be slightly tacky but not overly sticky.
Step 3: Knead the Dough
Turn the dough out onto a lightly floured surface. Begin kneading by pushing the dough away from you with the heel of your hand, folding it back over itself, and repeating.
Knead for about 8 to 10 minutes, until the dough becomes smooth and elastic. If the dough sticks too much, sprinkle a little flour, but avoid adding too much, as it can make the bread dense.
Step 4: First Rise
Place the kneaded dough into a lightly greased bowl, turning it once to coat the surface. Cover the bowl with a clean towel or plastic wrap.
Let the dough rise in a warm place for about 1 to 1½ hours, or until it has doubled in size. This is when the yeast works its magic, creating air pockets that will give your bread its soft texture.
Step 5: Shape the Dough
Once the dough has risen, gently punch it down to release the air. Transfer it to a clean surface and shape it into a loaf.
You can either form it into a traditional loaf shape and place it into a greased loaf pan, or shape it into a round boule for a more rustic look.
Step 6: Second Rise
Cover the shaped dough and let it rise again for about 30 to 45 minutes. It should puff up and nearly double in size again.
This second rise helps create a lighter, more airy texture in the finished bread.
Step 7: Bake the Bread
Preheat your oven to 180°C (350°F). Place the loaf in the oven and bake for 25 to 30 minutes, or until the top is golden brown.
You’ll know the bread is done when it sounds hollow when tapped on the bottom. The crust should be lightly golden and firm to the touch.
Step 8: Cool and Enjoy
Remove the bread from the oven and let it cool on a wire rack. While it’s tempting to slice into it immediately, allowing it to cool slightly helps the structure set.
Once ready, slice and serve with butter. The warmth of the bread will melt the butter instantly, creating a rich, comforting bite that’s hard to resist.
Tips for Perfect Bread
For the best results, always use fresh yeast. If your yeast doesn’t foam during activation, it may be expired or the liquid temperature may be off.
Avoid over-flouring the dough. A slightly sticky dough leads to softer bread, while too much flour can make it dense.
Give the dough enough time to rise. Rushing this step can result in a heavy loaf. A warm, draft-free environment is ideal for rising.
If you want a softer crust, brush the top of the bread with melted butter right after baking. For a slightly crispier crust, let it cool without covering.
Variations to Try
Once you’ve mastered the basic recipe, you can experiment with different flavors and additions.
Add herbs like rosemary or thyme for a savory twist. Mix in shredded cheese for a richer loaf, or sprinkle seeds like sesame or sunflower on top before baking.
You can also substitute part of the all-purpose flour with whole wheat flour for a heartier texture and nuttier flavor.
For a slightly sweeter version, increase the sugar and add a touch of honey. This works beautifully for breakfast bread or toast.
Serving Suggestions
This homemade bread is incredibly versatile. Use it to make sandwiches, toast it for breakfast, or serve it alongside soups and stews.
It’s especially delicious when served warm with butter, jam, or even a drizzle of olive oil. You can also use it to make garlic bread or transform it into croutons for salads.
Storage and Freshness
Store the bread in an airtight container or wrap it in a clean cloth at room temperature. It will stay fresh for about 2 to 3 days.
For longer storage, you can freeze the bread. Slice it before freezing so you can easily take out individual pieces as needed. Simply toast or warm in the oven before serving.
Final Thoughts
Baking your own bread is more than just a recipe—it’s an experience. From mixing the dough to watching it rise and finally enjoying the finished loaf, every step is rewarding.
This foolproof recipe proves that you don’t need fancy equipment or complicated techniques to create something truly special. With just a few simple ingredients and a bit of time, you can enjoy fresh, homemade bread whenever you like.
Once you taste the difference, it’s hard to go back to store-bought. The aroma, the texture, the flavor—everything about this bread feels authentic and satisfying.
So the next time you’re craving something warm and comforting, skip the bakery and head to your kitchen. This homemade bread recipe might just become your new favorite tradition.